Showing posts with label Cakes and Frostings. Show all posts

Tuesday, May 19, 2015

COCOANUT ZUCHINNI CAKE


COCOANUT ZUCCHINI CAKE

May ushers in early summer along with Mother’s Day. Irises, peonies, and roses begin blooming while stores are overloaded with colorful flats of annuals to temp one every time they shop.  This is the month I plant corn in my veggie garden and set out my heirloom tomato plants that have been hardened off.  May is also the time when I open all the windows in my house letting the warm breezes blow away all the stale air inside while freshly washed clothes dry out on the line.

For Mother’s Day this year, I made a Cocoanut Zucchini Cake that quickly became one of my favorite desserts. My Cocoanut Zucchini Cake is perfect for heralding in summer with green specks of zucchini and its light and moist texture in two layers.  I’ve always loved cocoanut in any form, but toasting the cocoanut brings out its subtle flavor even more and adds a slight crunch to each bite. Best of all the Cocoanut Zucchini Cake is easy to make.


COCOANUT ZUCCHINI CAKE

1 yellow cake mix
2 c grated zucchini
1 (16 oz) container of cool whip
2 c shredded cocoanut

Prepare the cake mix as directed folding in the zucchini before dividing into two 9-inch round cake pans. Bake at 350º for thirty minutes. Cool. Frost the bottom cake layer generously with cool whip sprinkling half of the toasted cocoanut on the top and sides.   Add top layer and frost with the remaining cool whip. Garnish using the rest of the toasted cocoanut. Chill and serve.

Tip: For a quick and easy way to toast cocoanut spread ½ c in a thin layer on a plate.  Microwave on high for 30 seconds. Stir and continue microwaving for 30 seconds stirring each time until golden brown!

Wednesday, March 14, 2012

Mint Brownie Ice Cream Cake


Mint Brownie Ice Cream Cake
Dorcas Annette Walker

The month of March is hemophilia awareness- the same month my son, Dwight, who has severe hemophilia, was born in on the thirteenth. Life has been a whirlwind ever since. Three years later, despite my sister’s frantic endeavors to bring on her labor earlier, my niece was born on Friday, March the thirteenth too. Thankfully Stacy does not have hemophilia. So when we found out that my daughter was due in March, Dwight and Stacy were dearly hoping that Dawn’s baby would also be born on the thirteenth. Since my daughter had to have a C-section her doctor chose March the second (they usually do a C-section about a week earlier) to Dwight and Stacy’s dismay.

Nevertheless my sweet little granddaughter stirred up quite a cyclone of her own. We were all at the Baptist Hospital in Nashville around noon- after driving through stormy weather that morning- when Dawn went back for her C-section. All the television stations were focused on the weather first around our state and then here in Tennessee as several tornadoes began moving across the state. Dawn’s C-section has just been finished and she was in recovery when the hospital went on alert. Everyone was hustled out into the hallway from the waiting room and then sent down to the dining room in the basement when the hospital went on full emergency mode shutting everything down.

Meanwhile Dawn ended up staying in the recovery room five hours instead of the usual one due to her having a bad reaction to one of the meds. Since the Baptist Hospital, for security reasons keeps the babies with their mothers, it wasn’t until after 8 pm that night that we got to hold tiny Katie Dawn in our arms for the first time. My sweet granddaughter was well worth the long wait, although my husband is threatening to call her “Stormy” instead of Katie.

My Mint Brownie Ice Cream Cake is a scrumptious birthday cake I’ve made up ahead of time to feature in this week’s column for Dwight’s birthday. Ever since Dwight was a teenager and I bought an ice cream cake for his birthday one year, he has always asked for an ice cream cake for his birthday. I have combined two of Dwight’s favorites: mint ice cream and brownies interlaced together with a fuggy chocolate topping to create this personalized cake. Even though the Mint Brownie Ice Cream Cake takes time to make, the look Dwight’s face when he takes his first bite will be well worth the effort. Preparation time for the Mint Brownie Ice Cream Cake is around thirty minutes (not counting freezing time).

Mint Brownie Ice Cream Cake

1 pan of brownies already prepared
2 (1.5 qts) mint chocolate ice cream
1 (11.75 oz) jar of hot fudge ice cream topping
1 (16 oz) container of cool whip

Soften ice cream in the microwave, spread into two 9-inch round cake pans, cover with wax paper, and freeze for a couple of hours. Dip a knife in hot water and move around the inside edge of one layer, run hot water over the bottom to dislodge the ice cream, and place on cake dish. Quickly spread half the jar of topping, sprinkle a layer of crumbled brownies on top, and refreeze. Pour the rest of the topping on the brownies, remove the second layer of ice cream and position on top. Frost with cool whip- refreezing if needed-, garnish the top with brownie crumbs, and then freeze until completely hardened!

Weekly tip: Ice cream cakes can also be layered in loaf pans and then frosted. Spraying a thin layer of cooking spray inside the pan helps the frozen ice cream slide out easier!

Dorcas Annette Walker is a published author, columnist, speaker, freelance magazine writer, and photographer from Jamestown, Tennessee. Contact her at: dorcasannettewalker@gmail.com For more recipes check out her Creative Tennessee Mountain Cookin blog at: www.dorcasannettewalker.webs.com

Wednesday, February 29, 2012

Deluxe German Chocolate Cake


Deluxe German Chocolate Cake
Dorcas Annette Walker

There is always something relaxing each time I step inside the hen house to collect eggs. Invariably a couple at hens will be sitting in their nests brooding over a stash of eggs that I rob while the rest of the flock stays in a frenzy of activity around my feet hoping for some extra crumbs to fall their way. I admit I do spoil my dear hens considering I have to push their feathery bodies out of the way just to gather eggs that range in colors from dark brown to a pale cream (some plain, others speckled) interspersed with a few white eggs. I always make sure to thank my fat hens and praise their bounty, especially when a first small egg has been laid.

Every flock has a pecking order and scrawny Priscilla is the one at the bottom in mine. I can’t help but admire her grit. Regardless of the fact that her white feathers stay constantly in disarray, Prissy is always the first one to greet me diving in between and around the other hens, staying a beak length away from the rest trying to put her back in her place, while inquisitive dark eyes check me out. Even as the hens press closely around my feet Prissy refuses to give up hopping around on her long skinny legs doing all kinds of contortions to dodge the sharp beaks aimed in her direction in order to remain close by. So I was quite proud the other day to discover Priscilla’s first-laid perfectly formed tiny white egg about the size of a quarter. This bedraggled hen, whose lot in life has daily difficulties to overcome, inspires me not to give up when life throws a curve my way. If Prissy can fulfill her duty as a hen, I too can stay optimistic.

My Deluxe German Chocolate Cake is not something put together quickly. Instead it is a culinary masterpiece well worth the effort involved with its elegant 4-layers. Each bite is scrumptious delights of moist cake with caramel amidst toasted coconut and pecans topped by fuggy chocolate frosting. Preparation time for the Deluxe German Chocolate Cake is forty-five minutes (not counting baking or cooling time) and serves eighteen.

Deluxe German Chocolate Cake

1 chocolate cake mix
1½ c black coffee room temperature
3 eggs
2 c br sugar
1 c evaporated milk
2 tb butter
1½ c shredded toasted cocoanut
1½ c chopped toasted pecans
1 (16 oz) container of chocolate frosting

Combine the cake mix, coffee, and eggs beating on medium speed for two minutes. Pour the batter into two 9-inch round greased cake pans and bake for thirty-five minutes at 350º. Remove from pans, cover, and cool. In a small pan mix together the sugar, milk, and butter with a Wisk. Bring to a boil and cook for fifteen minutes stirring frequently until thickened and caramel colored. Fold in one cup of the cocoanut and pecans. Microwave the frosting for a minute or so until runny. Cut each cake layer in half. Divide the caramel mixture into thirds placing one third on the first layer and drizzling a thin layer of frosting on top. Do the same for the second and third layer. Completely cover the top layer with the rest of the frosting letting it run down the sides. Sprinkle on the rest of the cocoanut and pecans. Let sit for four hours at room temperature before slicing!

Weekly tip: Toasting nuts brings out their rich flavor. A quick way to do this instead of using the oven is by placing the nuts in a bowl, microwave on high for one minute, stir, and microwave at thirty second intervals for another minute or two (stirring each time) until the nuts are fragrant and golden!

Dorcas Annette Walker is a published author, columnist, speaker, freelance magazine writer, and photographer from Jamestown, Tennessee. Contact her at: dorcasannettewalker@gmail.com For more recipes check out her Creative Tennessee Mountain Cookin blog at: www.dorcasannettewalker.webs.com

Wednesday, February 15, 2012

Red Velvet Cream Cake


Red Velvet Cream Cake
Dorcas Annette Walker

I remember as a youngster how the suspense would build each year right before Valentine’s Day. How many valentine cards would one receive? Would you be included in the popular girls’ list? Most important would a certain boy that you had your eye on give you a special card? We didn’t have money to buy store bought cards. Instead my mother would create attractive homemade heart cards years before the idea of crafts became trendy. I wish now that we had appreciated the time invested from an overworked mother and the intricate artwork instead of secretly longing for store bought cards to hand out like the few rich kids. Our mother also didn’t believe in showing partiality so we always had a card for every student in our class.

Finally Valentine’s Day would come and we would arrive at school loaded down with a stack of cards and a batch of cupcakes or a gallon of drink that had been designated for us to bring. That afternoon as our teacher set out the snacks us students would go around putting cards in the decorated boxes sitting on each desk. What anticipation and excitement as you opened up your stack of cards that were mostly homemade and read the signed name on the back.

When my children were young I would take the time and make homemade Valentine cards, but soon I ended up buying store bought cards like everyone else as it was so much easier and quicker. Now each year as I see the aisles stacked full of boxed Valentine cards- some of which look more like a horror movie advertisement than a Valentine card- and all the decorations, bags of candy, and commercialism that surround today’s youngsters, I sigh and remember the days when homemade Valentine cards and cupcakes was the norm.

My Red Velvet Cream Cake is ideal for making into a heart cake for your Valentine celebration with its soft cake texture surrounded by white frosting. The special pudding layer in the center makes this Red Velvet Cream Cake stand out. The elegant Red Velvet Cream Cake is something that even a beginner cook can make with success. Preparation time for my Red Velvet Cream Cake is about seventy-five minutes (not counting the cooling time) and this large heart cake serves twenty-two.

Red Velvet Cream Cake

1 red velvet cake mix
1 (3.4 oz) instant vanilla pudding
1½ c milk
½ c powdered sugar
½ tsp almond extract
1 (16 oz) container of vanilla frosting

Mix the cake mix according to the directions separating the batter in half and baking it in a heart-shaped pan. Cover and let cool. In a small bowl mix together the pudding, milk, sugar, and extract with a Wisk until smooth. Spread over top the first cooled cake layer. Carefully put the second heart layer on top of the pudding. Cover the sides and then the top of the cake with the vanilla frosting. Garnish with Valentine hearts, gel writing in red, or surround the cake with roses!

Weekly tip: Whenever an egg is stuck to the carton, wet the carton, and the egg will come out without breaking!

Dorcas Annette Walker is a published author, columnist, speaker, freelance magazine writer, and photographer from Jamestown, Tennessee. Contact her at: dorcasannettewalker@gmail.com For more recipes check out her Creative Tennessee Mountain Cookin blog at: www.dorcasannettewalker.webs.com

Thursday, August 25, 2011

Chocolate Angel Lightning Cake


Chocolate Angel Lightning Cake
Dorcas Annette Walker

I finally had a more normal week- meaning that I was able to stay home for a change instead of running my husband to one of his numerous doctor appointments, cardio rehab, or having another hospital episode- spending the week catching up on several things indoors and out that needed urgent attention when my week ended in a big bang. Saturday evening right after supper my husband and I were relaxing in the living room. A summer storm had arrived, thunder was rolling, and lightning flashing. I was enjoying hearing the sound of rain falling outside envisioning all my thirsty plants greedily drinking when suddenly right out of the blue a loud noise exploded and lit everything up like the noon day sun. Living here on the mountain we’re used to having violent storms come through- not to mention having a neighbor, who loves to shoot guns until it sounds like a war is in progress some days- but when I heard this explosion I knew something close by had been hit.

My husband asked, “What in the thunder was that?” as I jumped out of my recliner and ran to the back of the house. Rain was pouring down making it hard to see in the darkened twilight, but I noticed that the henhouse lights were out. My heart sank as I figured that my henhouse had been struck by lightning since I couldn’t see damage anywhere else. It was still storming when we went to bed. I was heartsick imagining discovering fried chicken the next morning in the henhouse. Nothing like a bolt of lightning rattling the henhouse and killing hens to put off egg laying for any of the surviving chickens left.

The next morning as soon as I awoke I ran to check the henhouse. My heart gave a leap of joy when I saw fat hens waddling around the pen busily scratching for worms looking quite unconcerned over their death-defying experience of the previous evening. While I fixed Sunday dinner, Dana went outside to investigate. A couple of minutes later Dana came back inside shaking his head telling me, “You’ve got to come outside and see this for yourself.” Lightning had struck the huge tree at the front corner of Dana’s workshop splitting it, ran down the tree, put a hole in the roof of the workshop, went inside blowing out paneling, insulation, window trim, light switches, etc (knocking out the henhouse lights that run from the workshop), then traveled across the yard to the main pole beside out house, flipped a main switch, and disabled our phones. The miracle is that nothing caught on fire, not a feather was singed, and we are still all in one piece.

My Chocolate Angel Lightning Cake will zap your taste buds with an explosion of melting chocolate, Carmel, and crunchy peanut butter surrounding the velvety angel food cake texture filled with chocolate chips that with either turn you diabetic or send any chocolate lover into orbit. The Chocolate Angel Lighting Cake has the appearance of a lightning strike right down the center. Preparation time for my Chocolate Angel Lightning Cake is around fifteen minutes (not counting baking or cooling time) and serves twelve.

Chocolate Angel Lightning Cake

1 angel food cake mix
1 c chocolate chips
½ (11.75 oz) jar Carmel ice cream topping
2 c powdered sugar
4 tb cocoa
2 tb crunchy peanut butter
1 tb shortening
¼ c hot water

Prepare angel food cake mix according to the directions folding in the chocolate chips before baking. Let cool. Spread melted Carmel topping over the top of the cake. In a small bowl mix together the powdered sugar, cocoa, peanut butter, shortening, and hot water with a Wisk until smooth. Pour over the top of the cake letting the frosting run down the sides and serve!

Weekly tip: When adding chocolate chips or nuts to a batter first dust with flour to prevent sinking to the bottom of the cake!

Dorcas Annette Walker is a published author, columnist, speaker, freelance magazine writer, and photographer from Jamestown, Tennessee. Contact her at: dorcasannettewalker@gmail.com For more recipes check out her Creative Tennessee Mountain Cookin blog at: www.dorcasannettewalker.webs.com

Thursday, June 23, 2011

Father's Day Cake


Father’s Day Cake
Dorcas Annette Walker

This Father’s Day our family will be especially grateful to have my husband, Dana, with us. Little did we realize over three months ago how fragile my husband’s hold on life was until he had a slight heart attack, which led to the finding out that the major arteries of his heart were blocked culminating in a 4 by-pass open heart surgery the first of April. The days before Dana’s heart surgery I was mostly concerned that he would make it into surgery before a major cardiac arrest happened as his vitals kept swinging wildly. I figured that once Dana had his heart surgery he would quickly bounce back on his feet like his usual self as my husband has always been healthy with a strong constitution. Unknown to me our life had already drastically changed. Instead of getting off the respirator within a couple of hours after heart surgery, Dana ended up having to stay on the respirator for over twelve hours when his body exhibited high levels of carbon dioxide. The next morning the left side of Dana’s face drooped. I knew this was a sign of a stroke, but when he started moving his hands and legs we became more concerned with the function of his left lung as the lower lobe had collapsed that turned into pneumonia and a buildup of fluid. After a couple of weeks in the hospital all I wanted to do was bring my husband back home and nurse Dana back to health confident that he would soon regain his strength. Meeting other fellows, who had gone through open heart surgery and recovered quickly only strengthened my resolve that Dana could rebound as well. Instead the last two months for us have been filled with continual complications with Dana’s breathing, more evidence with the passing of time the side effects of Dana’s neurological stroke, his sugar that persists in swinging despite taking four insulin shots a day all slowing down his recovery process. Our life now revolves around making sure that Dana gets his meds at the proper time, insulin shots, using his inhaler every four hours, between frequent doctor and ER visits. The last thing I am doing is complaining as I am so very grateful to have Dana still with me. The sad fact of life is that without trying or even meaning too in the daily race of life we take our loved ones for granted until an emergency strikes whether it be a serious car accident, tornado disaster, or a sudden heart attack. Suddenly our priorities change and we focus on what really is the most important to us. For our family having my husband, father, and grandfather with us will be a precious gift this Father’s Day. So on this Father’s Day don’t forget to honor the special father in your life that you still are privileged to have.

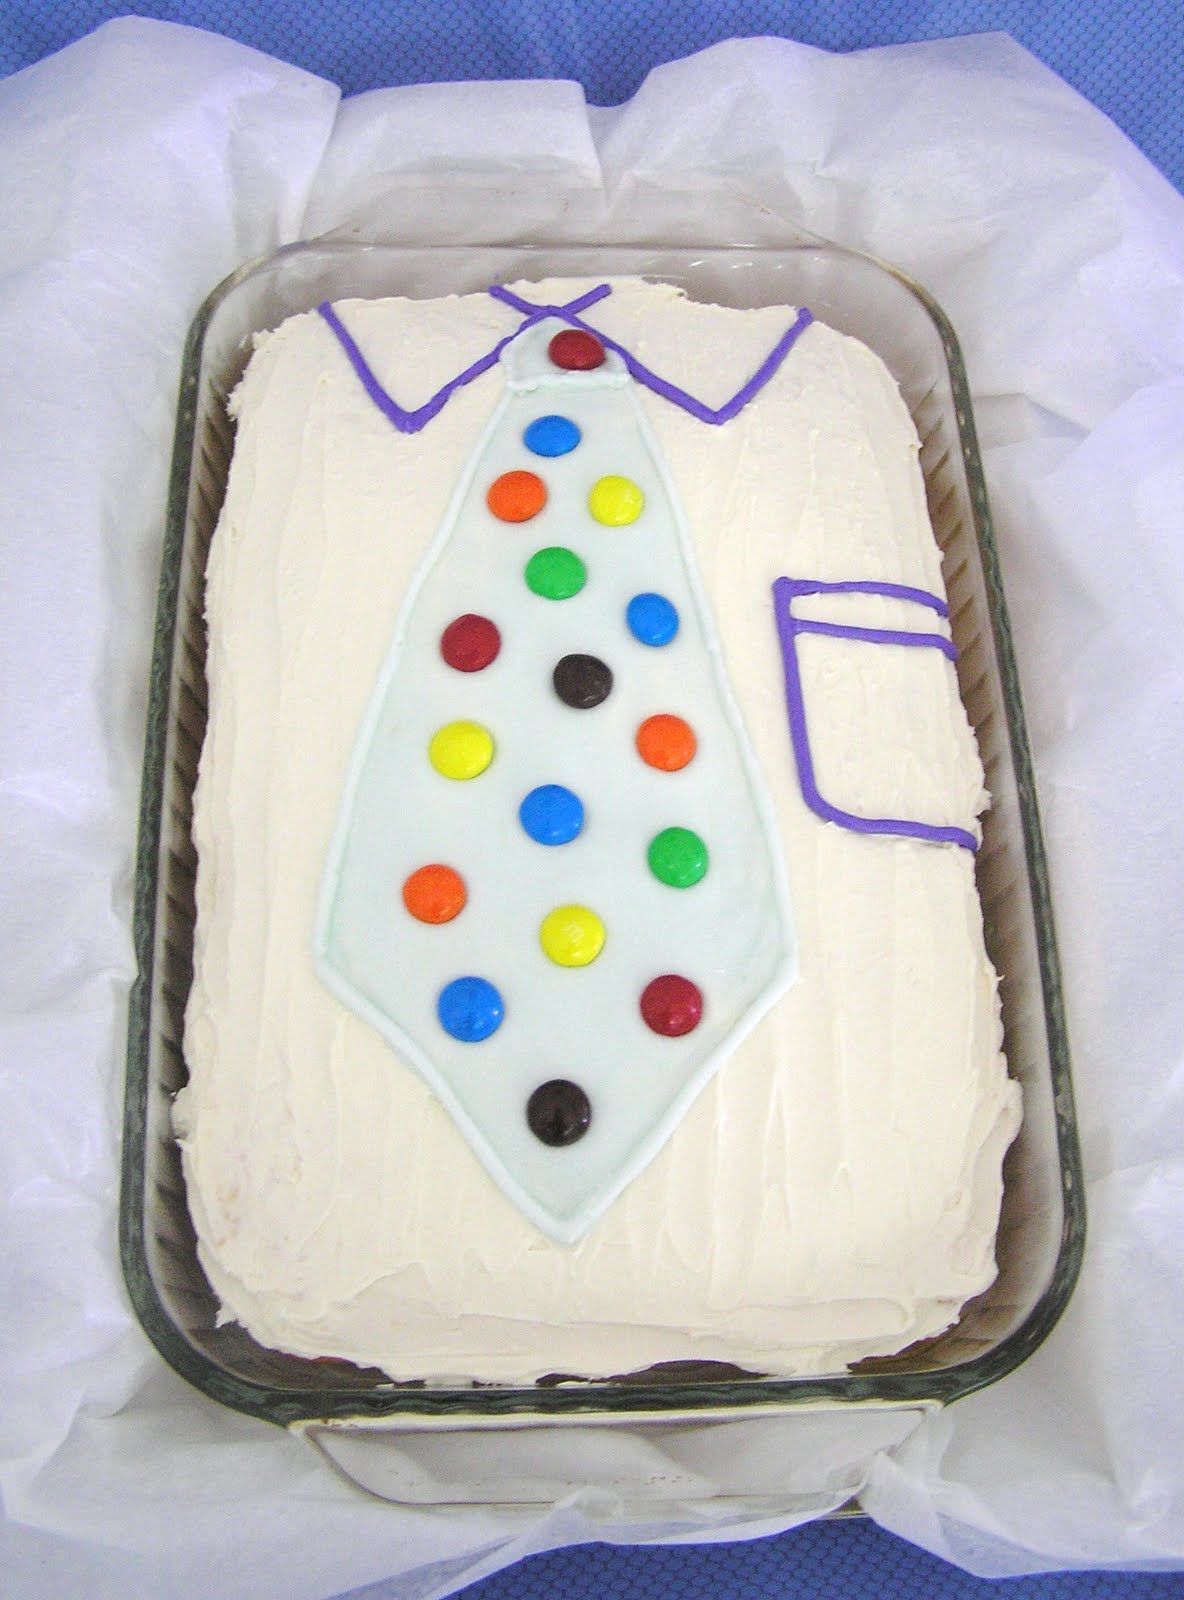
I saw this idea for a Father’s Day Cake in a magazine and was instantly captivated by its simplicity. The decoration of the Father’s Day Cake is easy enough that your children or grandchildren can help. Since Dana is on a strict diabetic diet I used a sugar free cake mix and frosting, but any cake mix or favorite brownie recipe could be utilized. Construct whichever shirt pattern you desire first with a toothpick and then decorate with different colored icing using frosting gels, small candies, chocolate chips, or sprinkles to help embellish your Father’s Day Cake. Preparation time varies depending on the how elaborately you craft your cake. This recipe makes one special 9 x 13 Father’s Day Cake.

Father’s Day Cake

1 cake or brownie mix- your choice
1 (15 oz) container of frosting- your choice
decorative candies

Prepare the cake mix as directed baking it in a 9 x 13 baking dish. Let cool, frost, and then decorate. Garnish by placing your decorated cake into a gift box with tissue paper!

Weekly tip: Use a baggie for small decorating jobs with frosting as it is quick, easy to handle, and can be discarded afterwards!

Dorcas Annette Walker is a published author, columnist, speaker, freelance magazine writer, and photographer from Jamestown, Tennessee. Contact her at: dorcasannettewalker@gmail.com For more recipes check out her Creative Tennessee Mountain Cookin blog at: www.dorcasannettewalker.webs.com

Wednesday, May 11, 2011

Lemon Raspberry Cream Cake


Lemon Raspberry Cream Cake
Dorcas Annette Walker

Whether motherhood comes by physically giving birth, adoption, or becoming a stepmother, one’s life will never be the same again. Motherhood challenges one’s mental, physical, and emotional state and once you become a mother you will always be a mother. I never could understand the phenomenon of how my mother every time we visited her, as an adult and mother myself, would revert back to my childhood days by asking me before we left to go anywhere, “ Dorcas did you remember to brush your teeth? Or Honey, you need to wear a coat it’s chilly outside.” Today I vex my own adult children with the same questions and advice whenever they are around. Little did I comprehend the first time I held my own tiny helpless infant in my arms how much my entire life would change. During the demanding days of toddlerhood, cheerleading early school days, and trying to keep up with the whirlwind teen years my own personality became merged with my children. When they are happy I am happy. Any upheavals in their world affect mine. Is it any wonder that mother’s tend to have a meltdown (labeled the empty nest syndrome) when their children take the first leap into the adult world? And yet I would have it no other way. I’ll never forget the look of awe in my daughter’s face as she held our first granddaughter close in the hospital and tried to explain her new feelings of motherhood to me- the exact same feelings I had for her as a newborn years ago- as Dawn said, “Mommy, I would do anything for Annette even if it meant having to give my own life.” I can’t comprehend women, who will neglect their children, abuse, or let them become abused. I’m glad once a year in the endless round of daily tasks we are given the chance to stop, celebrate, and take a moment to contemplate the precious gift given us- motherhood.

I decided this year to make a special dessert, Lemon Raspberry Cream Cake, for Mother’s Day. I can’t remember where I first got the idea for this cake, but it is something that brings out the creative side of me each time I make it. My Lemon Raspberry Cream Cake is a combination of some of my favorite ingredients that to me embodies springtime. I’m not the only one in my household wild over this cake. Last night when I gave my husband a small piece he told me, “You’d better put this under lock and key it’s so good.” Preparation time for my Lemon Raspberry Cream Cake is around thirty minutes (not counting the baking or cooling time) and this recipe serves sixteen- that is if you can stop with eating one piece.

Lemon Raspberry Cream Cake

1 lemon cake mix
1 c raspberries
1 c sugar
½ c water
¼ c cornstarch

Prepare the cake mix as directed using a bunt cake pan. Cool and cut in half. In a small saucepan combine the raspberries, sugar, water, and cornstarch. Bring to a boil, cook until thickened, and cool. Spread over the first cake layer and top with the second layer of cake.

Frosting:

2 c powdered sugar
2 tb shortening
½ tsp vanilla extract
¼ c milk
2 c sweetened cocoanut flakes

Beat powdered sugar, shortening, extract, and milk until smooth with a Wisk. Spread over the entire cake. Sprinkle on the cocoanut. May garnish with fresh raspberries and mint leaves!

Weekly tip: While flowers, cards, and phone calls brighten a mother’s heart the best gift you can give your mother is time with yourself!

Dorcas Annette Walker is a published author, columnist, speaker, freelance magazine writer, and photographer from Jamestown, Tennessee. Contact her at: dorcasannettewalker@gmail.com For more recipes check out her Creative Tennessee Mountain Cookin blog at: www.dorcasannettewalker.webs.com

Wednesday, February 16, 2011

Valentine Petit Fours


Valentine Petit Fours
Dorcas Annette Walker

Probably next to Christmas, Valentine’s Day is the most celebrated holiday; a day for sweetheart’s young and old. New love is exciting to behold in a new couple, but there is something even more romantic about an older couple, whose love instead of diminishing has deepened throughout the passing years. Unfortunately today, love seems too often be just a passing fancy for a short spell of time where commitment is thrown out of the window over trivial or selfish reasons only to discover later that they have shortchanged themselves in the long run. Instead love is a tender sprout that must be nourished and given careful attention if it will continue to grow, bloom, and bear fruit. When my husband and I got engaged on Valentine’s Day thirty-five years ago (and was married four months later), we set a goal of reaching fifty years together although people around us shook their heads and said that we would never last. Here are some things I’ve discovered throughout the years that love is:

- Not only romantic moments, but faithfulness during the daily grind of life
- Seeing a person at their worse and still loving them
- Communicating even when you don’t agree
- Giving each other space to be their own individual person
- Disagreements and arguments, but not quitting until it is worked out
- Being willing to forgive
- Sharing the enchantment of a newborn, frustrations of toddlerhood, and the whirlwind of teen years
- Spending hours at the bedside of young children during sickness and hospital stays
- Being flat broke and hanging in there together
- Hidden love notes, daily phone calls to stay in touch, and saying, “I love you”
- Facing an empty nest and discovering that you are still are friends
- Continuing to love each other as our bodies age

My Valentine Petit Fours are unique ways of showing your special valentine that you love them. You can write words, individual messages, or decorate your Valentine Petit Fours any way your heart desires. You can also use this idea for other holidays as well.

Valentine Petit Fours

1 pound cake
1 (16 oz) can vanilla frosting
wax paper
decorative candies/sprinkles/gel icing

Freeze the pound cake and then cut into 2 inch cubes. Microwave frosting 15 seconds at a time stirring in-between until the frosting is the consistency of heavy cream. With a fork holding the cube dip or run frosting until completely covered then use a knife to slide it onto wax paper. Decorate with candies, sprinkles, and gel icing. Let harden and serve on ruffled baking cups!

Weekly tip: You can use a hair dryer to slightly melt the frosting for a smooth glossy look before decorating!

Dorcas Annette Walker is a published author, columnist, speaker, freelance magazine writer, and photographer from Jamestown, Tennessee. Contact her at: dorcasannettewalker@gmail.com For more recipes check out her Creative Tennessee Mountain Cookin blog at: www.dorcasannettewalker.webs.com
Wednesday, January 19, 2011

Oatmeal Cake


Oatmeal Cake
Dorcas Annette Walker

Here is another recipe from scratch, which reminds me of the story about a newlywed, who asked the storekeeper where he kept the “scratch” because that’s what her husband said his mother made everything from. This Oatmeal Cake recipe is as old as the foothills of the Blue Ridge Mountains. I got this recipe from a young hill mother. We were from opposite ways of life, but became close friends. Mae had a daughter close to the same time as mine, but instead of a ruffled bassinet her baby bed was a plastic wash basket on the floor beside their bed. Her husband, Wade, came from a family of sixteen- it took a five gallon bucket of potatoes every meal. When we met them they already had eight children. With my first child I hemorrhaged, had to spend time in the hospital, was given blood, went down to ninety pounds, and it took me a full year to recover while Mae had babies every other year like she was fixing up a pan of cornbread.

Wade and Mae moved from a two-bedroom trailer to a small house perched on the side of a hill with rickety narrow wooden planks over a stream halfway to their house that I was scared to drive across. One morning partway across the “bridge” to get Mae to take her to the store carrying my nine-month-old daughter and a large diaper bag, I looked down to see a snake stretched out right under my feet. I screamed, took one flying leap, and ran the rest of the way up the hill not stopping until I reached the front porch where I collapsed. The kids were quite enthralled and spent the morning trying to find the snake while I endeavored to get my shattered nerves under control. We never did make it to the store that day.

After moving they bought a jersey cow for milk. One day Wade called. The cow had eaten some kind of weed and the vet said that it would probably go dry. Nothing daunted, my husband prayed over the cow reminding the Lord how much Wade and Mae needed milk for all their young’uns and how they shared their milk with us. The Lord answered prayer and instead of going dry the cow doubled its output to four gallons a day. Despite abject poverty the cow and young’uns thrived and the last we heard several years after moving from the area was that Wade and Mae’s children numbered eleven.

This Oatmeal Cake is a filling dessert ideal as a snack with a hot beverage. I added applesauce to the original recipe and you could add raisins as well. The cooked frosting sets this plain cake off. Preparation time for the Oatmeal Cake is forty-five minutes (not counting baking time) and this recipe serves twelve.

Oatmeal Cake

In a large bowl mix together, cover, and le set for twenty minutes: 1¼ c boiling water and 1 c quick oatmeal.

Then add:
1 c br sugar
1 c sugar
1 c applesauce
½ c shortening
2 eggs
1 tsp vanilla extract
Stir in and beat thoroughly:
2 c self-rising flour
¾ tsp cinnamon
¼ tsp nutmeg

Pour into a greased 9 x 13 baking dish. Bake at 350º for 35 minutes.

Cooked Frosting:

1 c br sugar
1 stick margarine
1 c cocoanut
3 tb milk
½ c chopped pecans

Bring to a rolling boil in a small saucepan, let simmer for ten minutes, and then spread over the warm cake!

Weekly tip: When needing to measure shortening or thick liquids, first spray the measuring cup with a cooking spray, measure the ingredient, and then pour out!

Dorcas Annette Walker is a published author, columnist, speaker, freelance magazine writer, and photographer from Jamestown, Tennessee. Contact her at: dorcasannettewalker@gmail.com For more recipes check out her Creative Tennessee Mountain Cookin blog at: www.dorcasannettewalker.webs.com

Wednesday, November 17, 2010

Fudgy Spice Cake


Fudgy Spice Cake
Dorcas Annette Walker

Originally called Armistice Day at the end of World War I, in June of 1954 Congress amended the Act of 1938 to officially make it Veteran’s Day in honor of American veterans of all wars. Each of us owes a great debt to the veterans living and dead for the freedoms we enjoy today. Veteran’s Day is a chance to stop our busy schedules, watch old glory wave high, listen to patriotic speeches, tap our feet to the music of parades, and pause for a moment to remember our veterans. Every year our church has a special Veteran’s Day service to honor the veterans with a home cooked meal in the fellowship hall afterwards. I made up a Walker-size cake for the church dinner this past Sunday. Next to the Walker clan’s love for their country is their love for eating.

The Walker fellows have a trait of not knowing their own strength or realize how intimidating they can appear when grouped together. One year when several of the family was meeting at the mission the crowd of men kept growing larger with each son’s arrival repeatedly asking Dad Walker, “Reverend, just how many sons did you say you had?” Dad loves to brag that he raised his own private body guards. The boys carry on the tradition of family tales. One time when their sister’s luggage was locked inside a small town bus station from her Greyhound bus arriving late at night after being delayed, the boys decided to break into the station and retrieve her stuff. A local cop spotted them and hauled them all down to the police station. After the chief of police heard the complaint, surrounded by four huge fellows that barely fit in the small station, he told the cop to let them go stating, “We don’t have enough man power to prevent these guys from breaking in.”

My Fudgy Spice Cake is a rich filling dessert deceptively simple to make with an eye-catching decorative design that makes it almost too pretty to cut and eat. Four layers of cake are surrounded by frosting making each moist bite a delight to eat. The Fudgy Spice Cake is ideal for holidays or a large crowd of people. You can substitute a nut cake mix or another flavor instead of spice. My Fudgy Spice Cake can be made up ahead of time as this cake keeps well. Preparation time for the Fudgy Spice Cake is around an hour and this recipe makes one large cake.

Fudgy Spice Cake

1 spice cake mix
3 (16 oz) cans of chocolate frosting
Almonds
Chocolate chips

Prepare cake mix like directed. Divide the batter into four parts pouring into greased 9-inch cake pans. Bake each layer at 350º for twenty minutes and cool. Cover each layer with chocolate frosting and then frost around the side and top. Using a tablespoon lightly depress the spoon into the frosting to make swirls around the side and top of the cake. Garnish with almond flowers!

Weekly tip: To make the almond flowers place five slivered almonds around a chocolate chip to form the petals!

Dorcas Annette Walker is a published author, columnist, speaker, freelance magazine writer, and photographer from Jamestown, Tennessee. Contact her at: dorcasannettewalker@gmail.com For more recipes check out her Creative Tennessee Mountain Cookin blog at: www.dorcasannettewalker.webs.com

Wednesday, July 7, 2010

4th of July Cake


4th of July Cake
Dorcas Annette Walker

Here on the mountain we celebrate the 4th of July with a bang. Our town is decorated with flags, there is a Demolition Derby, and we finished off the evening with lots of fireworks bringing out the patriotic spirit in all of us. For one evening feuds and ill will are laid aside as from every hollow and ridge each family unites in observing our nation’s birth. To celebrate the fourth this year, I came up with a quick and easy 4th of July Cake.

My neighbors also celebrate the fourth with lots of noise. When we first moved out here in the woods on a dead end gravel road it was a quiet and ideal place to raise children. Times changed when a rental trailer was moved in at the end of the road. Then the breakup of the neighbor and his wife- with her moving into a trailer beside the house and bringing in fellows, who loved to party- definitely livened up our area, especially when they would start yelling and shooting at her husband. You could hear the bullets hitting his tin roof. Our neighbors beside us finally got tired of having a Wild West show right in front of their house and moved. Each 4th of July my neighbors up and down the road start their fireworks during daylight hours so by the time it gets dark they have run out. Then they grab their guns and proceed to try and outshoot each other keeping up a volley of shots up until way past midnight. Any stranger wandering into the area might think that a war was in progress. My animals and I make sure to stay under cover and keep a low profile each year during my neighbor’s enthusiastic 4th of July celebrations while my flag waves a silent salute from the front porch.

My red, white, and blue 4th of July Cake is a perfect dessert to help celebrate Independence Day with its light moist fruity taste that is sure to be a hit with your family. Instead of one large cake, you could make individual cupcakes. Preparation time for my 4th of July Cake is fifteen minutes (not counting baking time) and this recipe serves at least twelve.

4th of July Cake

1 white cake mix
1 c blueberries
1 c raspberries
1 (8 oz) cool whip

Mix together the cake mix like the directions give. Pour the batter into a greased 10-inch round cake pan. Sprinkle one half of a cup of blueberries and raspberries on the top of the batter. Bake at 350º for 45 minutes until done. Flip up-side-down, cool, and frost with the cool whip. Use the rest of the berries to garnish the top of the cake!

Weekly tip: Insert a toothpick or knife into the center of the cake when baking to test if it is done. When the toothpick or knife comes out clean the cake is finished!

Dorcas Annette Walker is a published author, columnist, speaker, freelance magazine writer, and photographer from Jamestown, Tennessee. Contact her at: dorcaswalker@twlakes.net. For more recipes check out her Creative Tennessee Mountain Cookin blog at: www.dorcasannettewalker.webs.com

Wednesday, May 12, 2010

English Teapot Cake


English Teapot Cake
Dorcas Annette Walker

Usually the weekend of Mother’s Day I go down to Nashville to celebrate my grandkids birthdays, which are both in May. Since I won’t be with my daughter this year, I got to reminiscing past years and ended up thinking about my grandmother’s silver tray handed down to me, her oldest granddaughter, when I got married. Every Christmas my grandmother used her silver tray with her table decorations. I usually put the silver tray on my table at Christmas as well. The rest of the year it sits on a high shelf with oil lamps. So I decided to get it down and use it with my English Teapot Cake that I made for Mother’s Day in honor of my English grandmother. Even though my grandmother and mother are gone, I have lots of memories.

I’m not a professional cake decorator like my sister, but that doesn’t stop me from trying to decorate cakes. I’ve eaten some beautiful looking cakes that tasted horrible, were too sweet, or had inch-thick frosting, which my sweet-toothed husband loved. My rule of thumb in cooking is that food should first taste good and then look beautiful. Since trying my hand at cake decorating I’ve ended up with some non-perfect cakes, but they always tasted good. Interestingly enough it is my cake disasters like the tall layered engagement party cake that leaned like the Eiffel Tower and the peanut/chocolate groom’s cake top decorations that melted sideways, but still said “she made me do it” for my son that people remember instead of my perfect cakes. So if you’ve always wanted to decorate cakes don’t let the lack of professional training stop you. You may end up making a masterpiece that everyone will remember.

Today there are books on cake decorating, gels, and prepared decorative items to help a novice out. Just use your imagination and have fun. Whenever I’ve made my English Teapot Cake for a ladies meeting or birthday it has always been a hit. If the frosting isn’t perfectly smooth tell everyone that your cake is an antique teapot. Preparation time for the English Teapot Cake can take several hours. This large cake serves around twenty.

English Teapot Cake

2 pound cake mixes
1 c cooking oil
1 c water
4 eggs
¼ tsp butter flavoring
1 pkg of fondant icing
6 cups of frosting
couple drops of chocolate syrup

Beat together the cake mixes, oil, water, eggs, and flavoring on high for two minutes. The batter will be stiff. Pour half of the batter into a greased sports cake pan and bake at 350º for 45 minutes. Use a small amount of the batter to make a cupcake for a teacup and the rest for a second cake. Cool, level off the top of the cakes with a sharp knife, and then frost the first cake positioning it rounded bottom down on a paper doily. Frost the middle and the second half, putting them together to form the teapot. Roll and shape the fondant into a handle and spout. Let harden for a couple of hours. Decorate the teapot and teacup. Use a couple drops of chocolate syrup on the top of the teacup to look like coffee or tea. Garnish with a large silk rose on the top of the teapot!

Weekly tip: To tint frosting use a toothpick when adding color. Mix thoroughly before adding more color. By mixing different colors you can get a wider range of shades!

Dorcas Annette Walker is a published author, columnist, speaker, freelance magazine writer, and photographer from Jamestown, Tennessee. Contact her at: dorcaswalker@twlakes.net. For more recipes check out her Creative Tennessee Mountain Cookin blog at: www.dorcasannettewalker.webs.com

Wednesday, April 14, 2010

Hummingbird Cake


Hummingbird Cake
Dorcas Annette Walker

The beginning of April signals when I hang out my hummingbird feeders. I have always been fascinated by these miniature birds that appear every spring. The birch trees that line our driveway is a favorite spot for hummingbird nests. Summer evenings I sit out on my front porch captivated by the colorful flying jewels buzzing around. My feeders become a busy airstrip as a dozen or more hummingbirds swoop and dive in to feed. A big highlight of our family one summer was rescuing a hummingbird after a storm, feeling the magic of tiny claws perch on our finger while feeding, until it became strong enough to survive outdoors. I’m always spellbound when a hummingbird hovers near my face enjoying one of creation’s wonders up close. So this week I made a Hummingbird Cake.

Hummingbird facts:
- are among the smallest of birds with 325 to 340 different species; their English name is derived from the characteristic hum made by rapidly beating wings; they have 1,000- 1,500 feathers; the average ruby-throated weighs only 3 grams; the smallest bee hummingbirds measures 2.25 inches long; their average lifespan is 3-5 years
- they cannot walk or hop, but scoot sideways while perching; have no sense of smell, but very keen eyesight seeing ultraviolet light, which helps them identify certain plants
- their feathers are actually black; the iridescent colors are caused by refraction of light level, moisture, and other factors
- they breathe an average of 250 breaths per minute, but their heart rate can reach as high as 1,260 beats per minute while in flight
- can fly backwards and upside down; hover in midair by flapping their wings 12-90 times per second; flight speed is 25-30 mph, although in a dive they can reach 60 mph; most U.S. hummingbirds migrate to Mexico or South America flying nonstop 500 miles across the gulf of Mexico each spring and fall
- drink nectar from flowers, but also feed on insects and spiders; are continuously hours away from starvation only able to store enough energy to survive overnight; may visit up to 1,000 flowers daily; feed in many small meals; they do not suck the nectar through their long bills, but lick it with fringed forked tongues
- due to high energy cost the majority of their time is spent sitting or perching and digesting
- their nest is half the size of a walnut shell or smaller; they use spider silk to bind the nest material together and secure its support allowing the nest to expand with the growing young; two white eggs are laid about the size of a navy bean; a female can care for more than one nest at a time
- although the smallest of the bird species proportionately by body weight, hummingbirds have the largest brain in the bird kingdom; are also one of most aggressive birds attacking jay, crow, and hawks that infringe on their territory

My Hummingbird Cake is a rich, moist, and filling dessert that will add elegance to any meal. Instead of three layers you can make this into a large sheet cake. Preparation for the Hummingbird Cake takes about fifteen minutes and this recipe serves sixteen.

Hummingbird Cake

3 c self-rising flour
1 c sugar
1 c br sugar
1 tsp cinnamon
3 eggs
1 c cooking oil
2 tsp vanilla
1 (20 oz) can crushed pineapple
2 c mashed bananas
1 c chopped pecans
2 (16 oz) cans of cream cheese frosting
shredded coconut tinted or plain

In a large bowl mix together flour, sugars, and cinnamon. Add eggs, oil, vanilla, pineapple with juice, bananas, and pecans. Beat until all ingredients are well blended together. Divide the batter and pour into (3) 9-inch greased round cake pans. Bake at 350º for 35 minutes. Cool and frost with cream cheese frosting. Garnish with coconut and a sprinkling of chopped pecans!

Weekly tip: Homemade hummingbird nectar: 1 c sugar to 4 c water, boil, and then cool. You do not need to use red food dye to attract hummingbirds, instead plant or hang tubular flowers nearby. I’ve always had success with purple petunias!

Dorcas Annette Walker is a published author, columnist, speaker, freelance magazine writer, and photographer from Jamestown, Tennessee. Contact her at: dorcaswalker@twlakes.net. For more recipes check out her Creative Tennessee Mountain Cookin blog at: www.dorcasannettewalker.webs.com

Wednesday, February 17, 2010

Red Velvet Sweetheart Cake


Red Velvet Sweetheart Cake
Dorcas Annette Walker

Thirty-four years ago on Valentine’s Day my husband and I became engaged. I’ve kept all his love notes throughout the years in heart boxes. I also make card books by punching holes in cards tying them together with ribbon and using special cards to make placemats that I use for holiday decoration. While browsing through a book of Valentine cards I found this poem that my husband wrote me not long after we were married.

When our locks have turned to gray,
And our three score and ten years of days
Have spent themselves and flown swiftly away.
Still will I wish you at my side to stay;
For every day with you is a Valentine’s Day!
Dana Walker


It was an instant love affair as soon as I heard the intriguing name of Red Velvet Cake. Seeing and eating a piece of this colorful dessert only enhanced my devotion to this unique cake. Since then each year for Valentine’s Day I make a Red Velvet Sweetheart Cake. No matter how you celebrate Valentine’s Day my Red Velvet Sweetheart Cake will make a perfect addition to your Valentine holiday.

A recipe for Red Velvet Cakes appeared in numerous 19th century cookbooks and was considered a popular southern dessert, although cake at the time was considered to be a rich man’s food due to the ingredients being so expensive. Red Velvet Cake was a signature dessert at the Waldorf-Astoria Hotel in New York City during the 1920’s. After the Industrial Revolution baking ingredients became more affordable for the average folk. During World War II due to food rationing some bakers began using boiled red beets instead of food coloring for their Red Velvet Cake recipes while others believed that the combination of vinegar and buttermilk turned the cocoa to a red color. By the 1960’s Red Velvet Cake recipes were appearing across the nation in major newspapers. Red Velvet Cakes are typically frosted with a white butter cream or cream cheese frosting to give a dramatic contrast.

My Red Velvet Sweetheart Cake is a regal and moist cake that will capture instant attention with its deep red color making it a perfect Valentine’s dessert. Preparation time for the Red Velvet Sweetheart Cake is twenty-five minutes (not counting baking or cooling time) and this heart cake serves sixteen.

Red Velvet Sweetheart Cake

1 devil’s food cake mix
1 (1 oz) red food coloring
1 c cold water
3 eggs
½ c cooking oil
2 (16 0z) cans of cream cheese frosting

Beat the first five ingredients for two minutes and then pour half of the batter into a greased 9-inch heart shaped pan. Bake at 350º for twenty-five minutes. Repeat with the rest of the batter. Let both layers cool, frost, and then decorate your heart cake!

Weekly tip: The best Valentines come from the heart and don’t have to be elaborate. Even if you aren’t a professional cake decorator a simple homemade heart cake still sends a special message of love!

Dorcas Annette Walker is a published author, columnist, speaker, freelance magazine writer, and photographer from Jamestown, Tennessee. Contact her at: dorcaswalker@twlakes.net. For more recipes check out her Creative Tennessee Mountain Cookin blog at: www.dorcasannettewalker.com

Tuesday, January 5, 2010

Holiday Punch-Bowl Cake


Holiday Punch-Bowl Cake
Dorcas Annette Walker

Some people put up their Christmas tree on Christmas Eve and then take it down the day after Christmas. I like to have my Christmas decorations up the first week of December and then enjoy them until January. I’ve found that I get more pleasure out of my Christmas decorations after the rush of Christmas is over. Now I’m not advocating keeping Christmas lights up all year round like I’ve seen some folks do, but since Christmas comes just once a year why not stop to savor the season instead of fast forwarding it? My church has our adult Christmas party the week after Christmas. It has become a highlight of the year. We bring visiting family members, exchange gifts, and have a great time together. No matter what style of fashion you decide to end the old year with my Holiday Punch-Bowl Cake will help you celebrate.

Punch was first an Eastern drink taken from the Hindi word panch (five) for the five ingredients used to make punch as early as the 1600’s. Punch was introduced to the West in the seventeenth century and soon became the drink of England spreading to the American colonies by the eighteenth century where making punch was considered a social accomplishment. The earliest bowls were English and Dutch ranging from seven inches in diameter up to eight gallons. In the mid-eighteenth century Chinese porcelain became fashionable. It wasn’t until the nineteen century when cut glass punch-bowls were produced to use at festive occasions. George Washington established the tradition of serving punch to Congress on July 4th, 1790. The largest punch-bowl is the grand blue and white punch-bowl used by the first Continental Congress. The finest punch-bowl is of Liverpool Delft painted with blue ships and landscapes. The oldest punch-bowl decorated in red and gold resides in New York.

Punch drinking experienced its height from 1650 to 1850. Punch-bowls were used at husking parties, apple bees, elections, house-raisings, land sales, church dedications, baby christenings, and weddings. At funerals committees were appointed to mix and flavor the funeral punch. On Christmas Eve the punch bowl was filled and a silver coin and wedding ring dropped in to bring good luck to whoever received the item in their glass as people visited from house to house. Fashionable people in Boston served punch before dinner. By 1810 the Temperance movement was gaining momentum, which disapproved of punch drinking. Non-alcoholic punches began to circulate and soon punch became affiliated with church socials and ladies teas. Today the punch-bowl is used more as an ornament except for formal occasions.

My Holiday Punch-Bowl Cake is easy to prepare using ingredients that highlight the red and green Christmas colors when put into a glass punch-bowl. You can substitute other colors or fruit and use this basic recipe for holidays like the 4th of July or other celebrations throughout the year. To set off special occasions serve the Holiday Punch-Bowl Cake in punch-bowl glasses. Preparation time for my Holiday Punch-Bowl Cake takes about thirty-five minutes and this recipe serves twenty.

Holiday Punch-Bowl Cake

1 angel food cake
2 (20 oz) cans crushed pineapple drained
2 (3.4 oz) instant vanilla pudding prepared
2 (21 oz) cans cherry pie filling
3 (8 oz) containers of cool whip
green sprinkles

Tear angel food cake into bite-size pieces. Combine pudding and crushed pineapple in a large bowl. Four times layer in a glass punch-bowl: cake pieces with green sprinkles, pudding and pineapple mixture, cherry pie filling, and then cool whip. Garnish the top with red & green sprinkles, small decorative candy pieces, or pipe red and green icing gel in circles and weave a knife through. Cover with saran wrap and chill!

Weekly tip: When plastic wrap won’t cling, moisten the edge of a bowl or rim of container with water and it will stick immediately!

Dorcas Annette Walker is a published author, columnist, speaker, freelance magazine writer, and photographer from Jamestown, Tennessee. Contact her at: dorcaswalker@twlakes.net. For more recipes check out her Creative Tennessee Mountain Cookin blog at: www.dorcasannettewalker.com

Friday, December 11, 2009

Triple Chocolate Cheesecake


Triple Chocolate Cheesecake
Dorcas Annette Walker

This week I'm giving you my Triple Chocolate Cheesecake recipe and telling about the cat that came back so if you don't like chocolate or can't stand cats please bear with me. For those of you who love chocolate in any form this column is for you; now about my cat, Eloise Mae.

Eloise came into my life as a wild kitten rescued by my sister from her woods. If ever a cat lived a pampered lifestyle it was Eloise Mae. You would have thought that she would have purred the rest of her life away. Instead Eloise Mae lived a hide-a-way existence under different beds in our house showing her face to complain with loud meows every time she heard my voice. Even though Eloise grew into a beautiful large long-flowing-tailed cat with distinguished features of double paws, I was the only one she would tolerate. When she started howling at the foot of our bed each night, I reluctantly decided that Eloise would only be happy outdoors.

The next sunny day, I let Eloise out into my enclosed garden. When I went to check on her, she had disappeared. That night I went to bed with visions of Eloise hunting happily in our woods only to be awakened around midnight with a terrible racket. My German shepherds had treed Eloise up a porch post. When I went to rescue her, Eloise streaked back off into the darkness. I put out cat food, but never saw hide nor hair of Eloise. After a couple of months, I faced the fact that Eloise had left me for good.

The week of Thanksgiving a starved bedraggled cat showed up. I hardly recognized Eloise as half of her long beautiful tail had been cut off. Once indoors, for the first time in her existence, Eloise began to purr. She attacked the cat food and has spent her days since eating and sleeping by the food dish. Interestingly enough Eloise's whinny complaining personality hasn't changed one bit. But that's okay because you see Eloise Mae is part of our family and she is back home again.

I couldn't help but think how holiday gatherings don't always turn out picture perfect. Holidays have a way of bringing out the best and worst in people and invariably there is always someone who is never satisfied who will complain no matter what and continues to hold a grudge. Whether it is a family member, someone at work, or your next door neighbor personalities often clash. But I have decided to let the tidings of "peace on earth good will towards man" be my creed this holiday season.

My Triple Chocolate Cheesecake is a scrumptious holiday dessert to any chocolate lover with its smooth creamy filling over a crunchy chocolate crust topped by a drizzle of chocolate syrup. The Triple Chocolate Cheesecake takes only fifteen minutes to prepare and this recipe serves eighteen to twenty.

Triple Chocolate Cheesecake

12 fudge graham or chocolate cookies
1/2 stick margarine melted
4 (8 oz) pkg cream cheese
1 (16 oz) sour cream
4 eggs
1 1/2 c sugar
1/2 c cocoa
2 tb self-rising flour
1 tb vanilla
chocolate syrup

Crush chocolate cookies, add margarine, and press into the bottom of a 10-inch springboard pan. Bake for ten minutes at 350º. In a large bowl beat until smooth cream cheese, sour cream, eggs, sugar, cocoa, flour, and vanilla. Pour batter on top of the chocolate crust and bake for 45 minutes to one hour. Cool and chill. Garnish by drizzling chocolate syrup over the cheesecake before serving!

Weekly tip: For a perfect cheesecake do no over beat the batter, bake your cheesecake in the middle of a hot oven, take the cheesecake out of the oven before the center is totally set (it will wiggle when gently shaken), and cool the cheesecake completely before refrigerating!

Dorcas Annette Walker is a published author, columnist, speaker, freelance magazine writer, and photographer from Jamestown, Tennessee. Contact her at: dorcaswalker@twlakes.net For more recipes check out her Creative Tennessee Mountain Cookin blog at: www.dorcasannettewalker.com

Monday, November 30, 2009

Luscious Caramel Carrot Cake


Luscious Caramel Carrot Cake
Dorcas Annette Walker
I can remember when recipes for Carrot Cake suddenly became popular. Every cook wanted to try out a recipe for Carrot Cake and there were many discussions over which secret ingredients made the best texture or moist cake. At church dinners and reunions you always found a couple of Carrot Cakes to sample among other desserts. Then Carrot Cake mixes became available simplifying the preparation of this intriguing cake and suddenly Carrot Cakes were considered an ordinary cake that anybody could make. Even though I have used Carrot Cake mixes, I never was completeely satisfied with the end result. So I decided to mix some of the old with the new. I came up with waht I call my Luscious Caramel Carrot Cake. This rich cake is a perfect holiday dessert.
Food historians say that the origin of Carrot Cake was likely a type of carrot pudding enjoyed during medieval times and during the Middle Ages when sweetening agents were hard to come by. Carrot Cake became popular in Britain because of the rationing of sugar during the Second World War so as a result carrots were often used. American cookbooks did not start listing Carrot Cake recipes until the early 1900's. It wasn't until the 1960's that Carrot Cake became a dessert of choice at summer family reunions, picnics, and Mother Day celebrations in the United States. Carrot Cake Day is celebrated on February 3rd. Today carrot cake-flavored treats come in such varieties as: carrot cake latte, carrot cake ice cream, and carrot cake flavored treats for dogs. When traveling abroad you can even find fried Carrot Cake in Singapore and Malaysia.
Carrot Cake or Passion Cake is a cake which consists of grated carrots mixed with a spicy batter. The carrot softens in the cooking process making a cake of a soft dense textrure. The carrots themselves enhance the flavor, texture, and appearance of the cake. More adventurous bakers have branched out to embrace some rather exotic carrot cake recipes, which feature such ingredients as: pumpkin, coconut, figs or prunes, chocolate chips, oranges, zucchinni, crystallized ginger, beetroot, mashed sweet potatoes, and papaya. Some chefs also spice their batter with cinnamon, nutmeg, and cloves. Carrot Cake can be eaten plain, but is commonly frosted with white icing or cream cheese icing.
My Luscious Caramel Carrot Cake has a rich, moist cake texture filled with soft raisins, crunchy nuts, and bits of colorful carrots topped by a cream cheese icing that is not only pleasing to the eye, but gives you a homemade tasting delicacy as well. Nobody will believe that this cake uses a store-bought mix. You can substitute raisins for other dried fruit and individualize the taste by experimenting with different spices. The Luscious Caramel Carrot Cake can be as simple or complicated as you wish. Preparation time for my Luscious Caramel Carrot Cake is about twenty minutes (not counting baking or cooking time) and this recipe serves twenty.
Luscious Caramel Carrot Cake
1 carrot cake mix
1/2 c raisins
1/4 c diced or shredded carrots
1/4 c chopped nuts (your choice)
2 (12 oz) containers of cream cheese frosting
1/2 c caramel ice cream topping
Prepare the cake mix as directed adding the raisins, carrots, and nuts before beating. Divide the batter into (2) 9-inch round greased cake pans and bake at 350º for thirty minutes. Let the cakes cool. Whip the cream cheese frosting on high for five minutes and then frost the first cooled layer. Drizzle half of the caramel topping on top of the frosting. Position the second layer over the first and completely cover the cake with frosting. Garnish the cake with shredded carrots, chopped nuts, and caramel topping drizzling it over the top and down the sides!
Weekly tip: You can always change any layer cake recipe into a sheet cake using a 9 x 13 baking dish saving more time. Only use one can of frosting for a sheet cake!
Dorcas Annette Walker is a published author, columnist, speaker, freelance magazine writer, and photographer from Jamestown, Tennessee. Contact her at: dorcaswalker@twlakes.net For more recipes check out her Creative Tennessee Mountain Cookin Blog at: http://www.dorcasannettewalker.com/

Wednesday, July 8, 2009

Boston Cream Pie


Boston Cream Pie

Dorcas Annette Walker


The few recipes that I have in my mother’s hand writing are very special to me. As stated before since my mother seldom baked any unique dessert that she made became a red letter day for us. Our house simply buzzed with excitement the day my mother announced that she was going to try and make a Boston Cream Pie. This elaborate dessert turned our evening meal an instant celebration. I remember my father shaking his head and muttering that he didn’t see what all the fuss was about over a cake with pudding in the middle as my mother, beaming with pride, served each of us a piece of her Boston Cream Pie. Since Boston was the site where the first shot was fired heralding the beginning of our independence from Britain, I thought that my mother’s Boston Cream Pie recipe would make an excellent dessert for this 4th of July celebration.


The Boston Cream Pie is actually a round cake filled with custard cream pudding and frosted with chocolate. The Boston Cream Pie was invented by a French pastry chef at Boston’s Parker House Hotel in 1855 when he decided to top off an English cream cake with chocolate and put almonds around the outside. One early version of the Boston Cream Pie simply sprinkled powdered sugar on top while another included a raspberry jelly filling. Some Boston Cream Pies were made with white cakes while others used a sponge cake. The cake/pie had it’s origin in colonial days and was sometimes called a Pudding-Cake pie as in the mid-nineteenth century pie tins were more common than cake pans. The first Boston Cream Pies could easily have been baked in pie tins. In 1996 the Boston Cream Pie was officially proclaimed the certified Massachusetts State Dessert.


The Boston Cream Pie is a rich filling dessert ideal for family reunions or gatherings throughout the year. While this Boston Cream Pie recipe has had several steps shortened compared to original recipes, preparation time is still around an hour not counting cooling time. My Boston Cream Pie serves eighteen.


Boston Cream Pie


Prepare one yellow cake mix as directed baking in two layers. Cut the top of each layer flat and cool for around an hour.


In a small saucepan mix together with a Wisk:
4 eggs
½ c sugar
½ tsp salt
1 tb cornstarch dissolved in 1 c evaporated milk
Cook using medium heat while stirring constantly until thickened. Take off heat and add:
1 ½ tsp vanilla
Continue to beat with a Wisk until the pudding cools slightly. Pour the pudding over the top of one layer and spread around evenly. Place the second layer on top of the pudding.


Then in a small bowl mix together:
2 c powdered sugar
4 tb cocoa
2 tb shortening
¼ c hot water
Beat until smooth with a Wisk and pour over the top of the cake letting the chocolate run down the sides. Store the Boston Cream Pie in an airtight container. You may garnish the cake with sliced almonds!


Weekly tip: For a smooth sharp cut on a baked cake use a long bread knife that has been heated by running under hot water and dried with a paper towel. For gooey or sticky cakes use un-waxed dental floss!


Dorcas Annette Walker is a published author, columnist, speaker, freelance magazine writer, and photographer from Jamestown, Tennessee. Contact her at: dorcaswalker@twlakes.net. For more recipes check out her Creative Tennessee Mountain Cookin blog at: www.dorcasannettewalker.com