Wednesday, July 14, 2010

Summer Potato Salad


Summer Potato Salad
Dorcas Annette Walker

The scorching hot “dog days” of summer are upon us. For those of you who don’t live in the mountains “dog days” are when you are extra careful walking in the woods to watch for snakes as this is the time of the year when they shed their skins and are more likely to strike out with their fangs. The name comes from the ancient Romans, who considered Sirius to be the “dog star” because it was the brightest star in the constellation shining between early July and August and responsible for hot weather when rainfall is at its lowest levels. During this time my dogs hide out under the back porch seeking a cool spot to snooze the day away while I stay indoors enjoying the modern convenience of an air conditioner. The mind feels sluggish and the body slow as the heat outside rises with temperatures that stays humid even when the sun has set.

So I only work outside in my garden first thing in the morning while it is still cool. The experts are now informing us that gardening is beneficial to your physical and mental health. They figure that forty-five minutes of gardening can burn that many calories and is as good as thirty minutes of aerobics. How my farmer grandparents would shake their heads and laugh to see all the hype going on today about tanning beds and aerobic classes. Every time I turn around another weight loss or body building gym is opening up. All a person has to do to get a tan and a plenty of exercise is to plant and maintain a garden. Instead of staying indoors riding circles on an exercise bike hoeing rows of corn is guaranteed to give you a full body workout. No weight-lifting equipment can compare with eating fresh corn off the stalk that you have grown yourself or digging into a hill of new potatoes.

My Summer Potato Salad is a brand new recipe that originated from an idea I read about. This Summer Potato Salad has the tangy taste of a freshly tossed garden salad. My son, who generally doesn’t care for potato salad, actually took a second helping of my Summer Potato Salad. You can add shredded carrots, radishes, black olives, diced red and green peppers, fresh peas, green beans, or substitute your favorite salad dressing. Preparation time for my Summer Potato Salad is around thirty-five minutes (not counting cooling time) and this recipe serves eight.

Summer Potato Salad

8 medium size potatoes
1 tsp salt
1 small onion and clove of garlic minced
1 tb minced chives
½ c bacon bits
salt & pepper
2 c mayonnaise
1½ c blue cheese salad dressing
1 c ranch salad dressing

Cover and boil potatoes with salt in water for twenty minutes until the potatoes are soft. Rinse in cold water and let the potatoes cool. Peel and cube into a medium-size bowl. Add onion, garlic chives, and bacon bits. Sprinkle on salt and pepper to taste. Mix in mayonnaise, blue cheese and ranch dressing until well blended. Cover and chill. Garnish with a sprinkle of paprika and serve on a lettuce leaf!

Weekly tip: White potatoes are low in starch and are good for boiling; yellow potatoes or Russet potatoes are high in starch and are good for mashing and baking; while red and yellow potatoes are best for steaming, boiling, soups, stews, roasting or scalloped!

Dorcas Annette Walker is a published author, columnist, speaker, freelance magazine writer, and photographer from Jamestown, Tennessee. Contact her at: dorcaswalker@twlakes.net. For more recipes check out her Creative Tennessee Mountain Cookin blog at: www.dorcasannettewalker.webs.com

Wednesday, July 7, 2010

4th of July Cake


4th of July Cake
Dorcas Annette Walker

Here on the mountain we celebrate the 4th of July with a bang. Our town is decorated with flags, there is a Demolition Derby, and we finished off the evening with lots of fireworks bringing out the patriotic spirit in all of us. For one evening feuds and ill will are laid aside as from every hollow and ridge each family unites in observing our nation’s birth. To celebrate the fourth this year, I came up with a quick and easy 4th of July Cake.

My neighbors also celebrate the fourth with lots of noise. When we first moved out here in the woods on a dead end gravel road it was a quiet and ideal place to raise children. Times changed when a rental trailer was moved in at the end of the road. Then the breakup of the neighbor and his wife- with her moving into a trailer beside the house and bringing in fellows, who loved to party- definitely livened up our area, especially when they would start yelling and shooting at her husband. You could hear the bullets hitting his tin roof. Our neighbors beside us finally got tired of having a Wild West show right in front of their house and moved. Each 4th of July my neighbors up and down the road start their fireworks during daylight hours so by the time it gets dark they have run out. Then they grab their guns and proceed to try and outshoot each other keeping up a volley of shots up until way past midnight. Any stranger wandering into the area might think that a war was in progress. My animals and I make sure to stay under cover and keep a low profile each year during my neighbor’s enthusiastic 4th of July celebrations while my flag waves a silent salute from the front porch.

My red, white, and blue 4th of July Cake is a perfect dessert to help celebrate Independence Day with its light moist fruity taste that is sure to be a hit with your family. Instead of one large cake, you could make individual cupcakes. Preparation time for my 4th of July Cake is fifteen minutes (not counting baking time) and this recipe serves at least twelve.

4th of July Cake

1 white cake mix
1 c blueberries
1 c raspberries
1 (8 oz) cool whip

Mix together the cake mix like the directions give. Pour the batter into a greased 10-inch round cake pan. Sprinkle one half of a cup of blueberries and raspberries on the top of the batter. Bake at 350º for 45 minutes until done. Flip up-side-down, cool, and frost with the cool whip. Use the rest of the berries to garnish the top of the cake!

Weekly tip: Insert a toothpick or knife into the center of the cake when baking to test if it is done. When the toothpick or knife comes out clean the cake is finished!

Dorcas Annette Walker is a published author, columnist, speaker, freelance magazine writer, and photographer from Jamestown, Tennessee. Contact her at: dorcaswalker@twlakes.net. For more recipes check out her Creative Tennessee Mountain Cookin blog at: www.dorcasannettewalker.webs.com

Thursday, July 1, 2010

Homemade Sticky Buns


Homemade Sticky Buns
Dorcas Annette Walker

Ever since the first time I made up a batch of my Homemade Sticky Buns when my father-in-law came for a visit, he always requested them afterwards. My house seemed to shrink every time the Walker clan arrived. First you’d hear a vehicle honking as soon as it turned into our driveway and next my father-in-law sergeant’s booming voice announcing the obvious fact that they were there. Even the entire neighborhood stood at attention during his visits. After retiring from the military my father-in-law still “barked” his requests. Being brought up in a quiet household it was years before I quit jumping at each roar of my father-in-law’s voice next to my ear whenever we conversed. The walls would vibrate with noise and confusion as each Walker shouted at the top of their lungs all talking at the same time.

I’d find refuge in my kitchen cooking and baking nonstop to satisfy all the hungry mouths. My father-in-law viewed each dish or dessert that I prepared with exclamations of delight like a starved man. So I figured it was my duty as part of the Walker family to try and fill up my father-in-law while he resided under my roof. Once the prayer had been said mealtimes quickly resembled a military attack as hands would grab the food nearest to them in a regular blitz motion despite my feeble efforts to pass each dish around the table. When everyone finally settled down to their own individual plates to commence eating my husband would ask me why I didn’t have anything on my plate. My father-in-law would look over in my direction in amazement and retort, “What’s the problem? All she has to do is ask!” I never became skilled at aggressively battling for food when my in-law’s were around. Instead I was always happy to settle for anything left after the first major skirmish.

My finger-licking Homemade Sticky Buns- what some call cinnamon rolls -will bring a smile of pleasure to your household. Nuts, raisins, or dried fruit can be added as well. Instead of making up a batch of rolls from scratch, I started using frozen bread dough. In a pinch you can also use frozen rolls or store bought frosting as well. Preparation time for my Homemade Sticky Buns is around three hours and this recipe makes one dozen rolls.

Homemade Sticky Buns

1 frozen bread roll
1 tb margarine
½ c brown sugar
cinnamon

Let the frozen dough thaw for one hour. Then roll out the dough thin in a rectangular shape. Spread margarine, layer the brown sugar, and then sprinkle on cinnamon. Roll up lengthwise and cut into one inch pieces with a sharp knife. Place each spiral in a greased 9 x 13 baking dish, cover with a paper towel, and let rise for two hours until doubled in size. Bake at 350º for fifteen minutes until lightly browned.

Frost with:

1 c powdered sugar
1 tb shortening
2 tb milk
½ tsp vanilla extract

Beat all the ingredients with a Wisk until smooth and spread over the sticky buns. Garnish with a sprinkle of cinnamon!

Weekly tip: To help bread or rolls rise you can turn on your oven at the lowest setting for a couple of minutes with a pan of hot water, set them in sunlight or a warm spot, or use a heating pad underneath turned on medium!

Dorcas Annette Walker is a published author, columnist, speaker, freelance magazine writer, and photographer from Jamestown, Tennessee. Contact her at: dorcaswalker@twlakes.net. For more recipes check out her Creative Tennessee Mountain Cookin blog at: www.dorcasannettewalker.webs.com

Wednesday, June 23, 2010

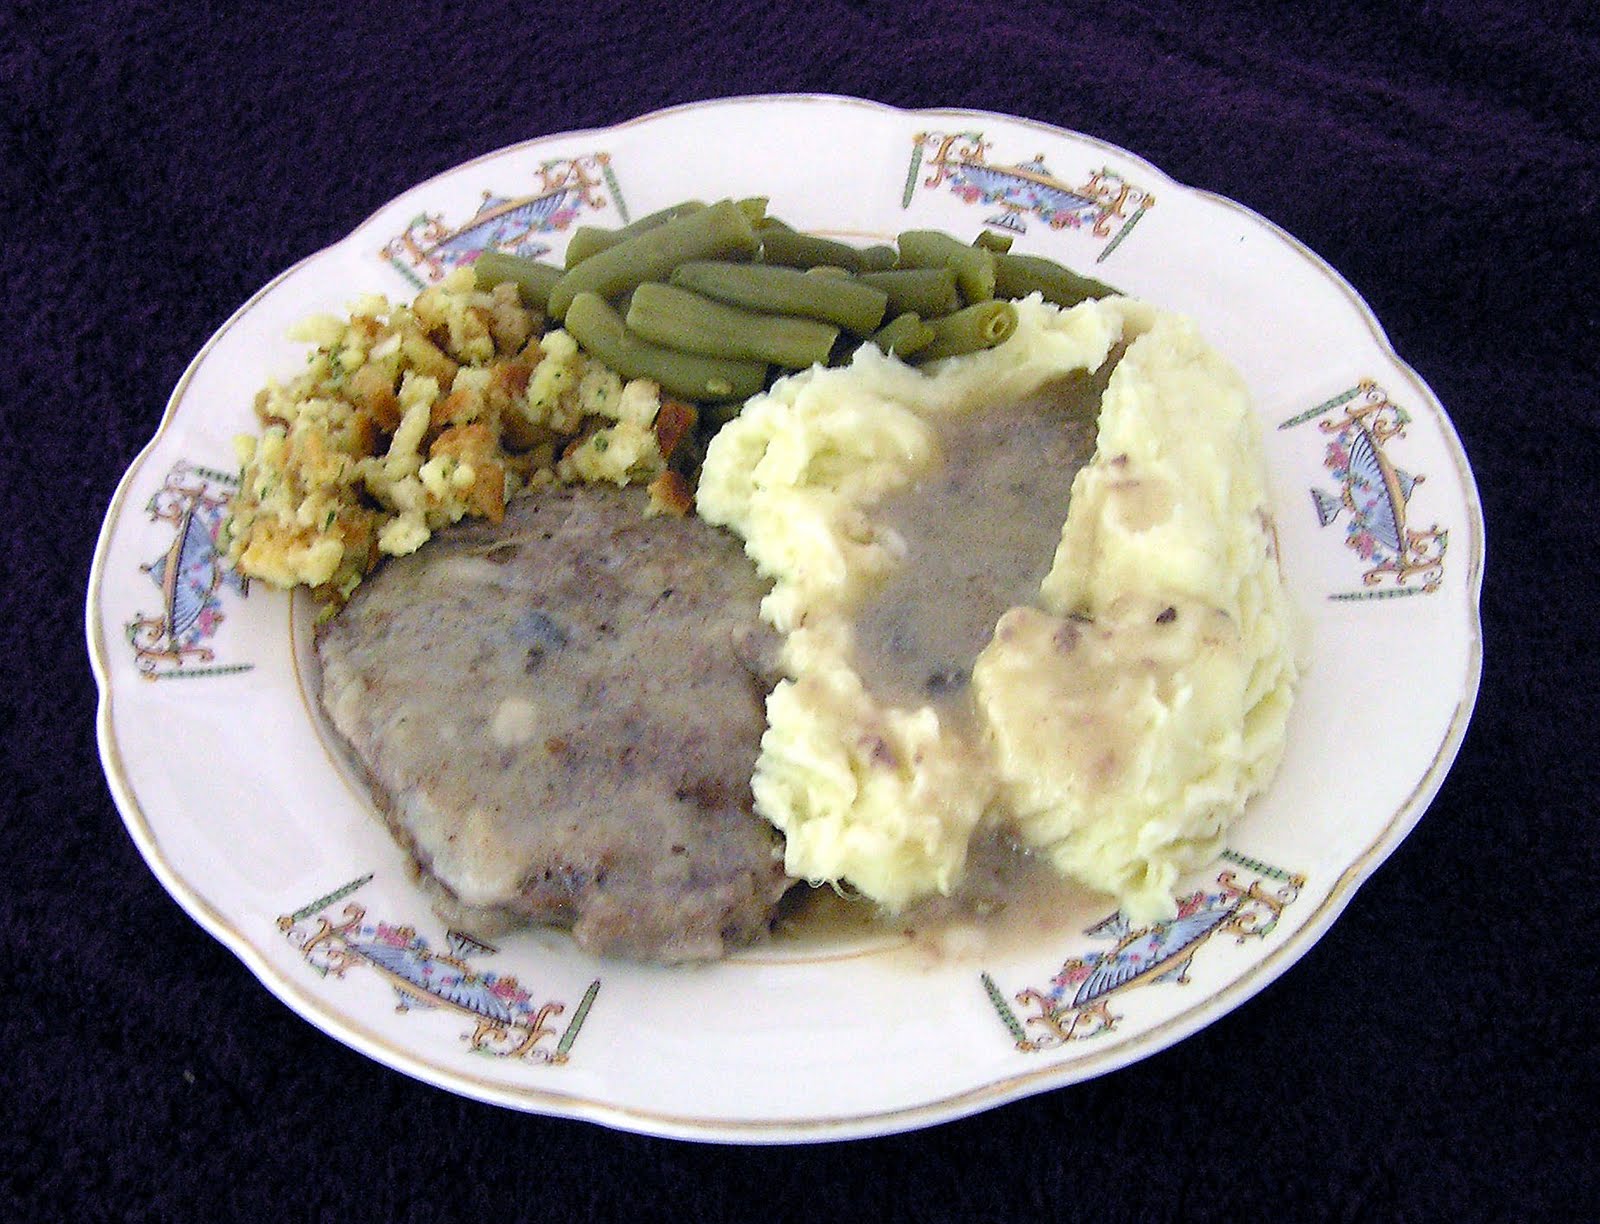
Poor Man's Steak & Gravy


Poor Man’s Steak & Gravy
Dorcas Annette Walker

For Father’s Day I am going to repeat a favorite recipe that all the guy chefs have responded to the most and something that my fellows love as well. All the men in the Walker clan have enormous appetites when it comes to food. Something I quickly discovered when a couple of weeks after getting married part of the family arrived and spent most of the summer with us. Thankfully, although I was only seventeen years old, I had grown up cooking and enjoyed spending time in the kitchen. Even so I wasn’t prepared for the Walker appetites. I’ll never forget the first meal. Wanting to make a good impression on my in-laws, I got out my largest cooking pots, and went to work carefully setting the table with my best dishes. With the meal prepared and dessert finished I summoned everyone to the table. My confident smile disappeared when the food barely made it around the table. I felt guilty that I couldn’t offer seconds, but breathed a sigh of relief that I had made a cake for dessert. To my amazement the entire cake (which in our family lasted for over a week) disappeared just as fast. The couple pieces left from the initial round were fought over and eaten. With loud praises for my cooking ringing in my ears, I sat in stunned silence at the deserted table staring at all the empty plates. Doubling my recipes was useless against the Walker clan’s huge appetites. I decided on the spot to triple or quad-triple them.

It was my mother, who gave me the original recipe for Poor Man’s Steak & Gravy. The only problem was that sometimes in my tight schedule of traveling with my husband and getting company soon after arriving back home I would plan to make Poor Man’s Steak & Gravy only to forget to prepare it the night before. One day as I was frantically racking my brains for something else to fix, I browsed through my freezer and I spotted a box of frozen hamburgers. Presto! A light bulb went off in my head. Why couldn’t I use frozen hamburgers instead? No one seemed to notice the difference. It was a quick and easy version of the original Poor Man’s Steak & Gravy recipe and became an all-time favorite. I discovered that frozen hamburgers stick together better than the original version of raw hamburger mixed with crackers when cooked. You can also fix this recipe in a crock pot. Just brown the hamburgers and pour the liquid ingredients over the meat. Poor Man’s Steak & Gravy always brings a smile to my fellow’s faces every time I serve it even though I’ve made it endless times. Preparation time for the Poor Man’s Steak & Gravy takes around an hour and this recipe serves four.

Poor Man’s Steak & Gravy

4 frozen hamburger patties
½ c self-rising flour
3 tb shortening
salt & pepper
1 can cream of mushroom soup
1 can water
1 can milk

Melt shortening in a large iron skillet. Roll hamburgers in flour and brown. Shake on salt and pepper. Mix together soup, water, and milk. Pour over browned meat and simmer for thirty minutes. Serve with mashed potatoes, stove-top dressing, and a vegetable!

Weekly tip: Always freeze meat after buying it at the store unless you plan on using it up the next day. Not only will this prevent the meat from spoiling, but you can buy larger packs on sale as well!

Dorcas Annette Walker is a published author, columnist, speaker, freelance magazine writer, and photographer from Jamestown, Tennessee. Contact her at: dorcaswalker@twlakes.net. For more recipes check out her Creative Tennessee Mountain Cookin blog at: www.dorcasannettewalker.webs.com
Thursday, June 17, 2010

Hardy Man's Biscuits & Gravy


Hardy Man’s Biscuits & Gravy
Dorcas Annette Walker

All you have to do to get my husband, son, and son-in-law drooling is to tell them that you are making biscuits and gravy for breakfast. I confess the problem is that I am not a big breakfast cook. It’s all my husband’s fault of course. I was prepared when I got married to faithfully get up every morning and cook breakfast for my husband. Imagine my shock when I found out that Dana didn’t eat breakfast. Just between you and me, it also was a relief as first thing in the morning the last thing I want to eat is something that will weigh heavy on the stomach and be full of cholesterol. Instead I always start my day off with a bowl of cereal.

Six years later we moved into the mountains of Tennessee and Dana was introduced to the mountain style breakfast of biscuits and gravy. Suddenly he felt like he had been deprived all his life. By then I was stuck in my morning routine of eating cereal with the kids. Like a good wife I also was concerned about my husband’s weight problem. So biscuits and gravy became reserved for special occasions. I began taking notes and talking with different mountain cooks in order to make my brown gravy taste like theirs. My daughter grew up and married Granny’s grandson, who is known for her gravy and biscuits. One of the first things Dawn set out to do after she was settled in her own home was learn how to make biscuits and gravy like Granny. Then my son married and his mother-in-law makes biscuits and gravy every Sunday morning. So even though my children were not raised on biscuits and gravy they somehow survived. With today’s hectic work schedules most mountain families now only prepare biscuits and gravy on weekends.

My Hardy Man’s Biscuits & Gravy is a filling mountain breakfast that will bring a big smile of satisfaction to the man of your house. Some serve fried eggs and potatoes along with the biscuits and gravy. You can also fold in small pieces of bacon, sausage, or shredded cheddar cheese to the biscuits before baking for a special treat. Using store biscuits saves time and what I used in the Hardy Man’s Biscuits & Gravy. Preparation time for my Hardy Man’s Biscuits & Gravy is about thirty-five minutes and this recipe serves four.

Hardy Man’s Biscuits & Gravy

1 (12 oz) pkg pork sausage- any brand
1 (16 oz) can jumbo buttermilk biscuits
½ c self-rising flour
4 c milk
½ tsp salt
pepper

Cut the pkg of sausage into ten pieces and fry in a large iron skillet until brown. Drain on a plate with a paper towel and cover. Place the biscuits on a baking sheet and bake at 350º for fifteen minutes until golden brown. Meanwhile stir the flour with the sausage grease and brown. Add milk, salt, and pepper to taste. Stir briskly until smooth and bring to a boil until thickened. Serve hot over biscuits and with sausage!

Weekly tip: The mountain women use the metal spatula that was used for frying and turning the sausage to also stir the gravy as well!

Dorcas Annette Walker is a published author, columnist, speaker, freelance magazine writer, and photographer from Jamestown, Tennessee. Contact her at: dorcaswalker@twlakes.net. For more recipes check out her Creative Tennessee Mountain Cookin blog at: www.dorcasannettewalker.webs.com

Wednesday, June 9, 2010

Five Minute Pork N Beans


Five Minute Pork N Beans
Dorcas Annette Walker

Continuing through the month of June I am going to give recipes catering to the fellows that are some favorites of my guys and are easy to make. Since my husband is a hardy meat eater most of the recipes will feature some kind of meat. I have to confess that I didn’t have a written recipe for my Five Minute Pork N Beans until now. I had to make up a batch of my pork and beans in order to write down the exact measurements. Throughout the years I have tweaked ingredients around -with my family member’s critiques- until I achieved what I remembered of my grandmother’s homemade baked beans- she also didn’t use a recipe.

I’ve made baked beans from scratch for years, but it is a long process as you have to first soak the beans, then cook them, flavor the beans, and finally bake them- unless you skip the cooking time and add more hours of baking. Since I often found myself running short on time when my kids were small I figured that there had to be a way of using canned beans as a shortcut without sacrificing the taste of homemade baked beans so I began to experiment around. When my daughter, who only goes by exact measurements as she cooks, got married and wanted my recipe for pork and beans she was quite frustrated when I told her that all you had to do was pour in some catsup until it changed the color, add a dab of mustard, sprinkle on some brown sugar, pour in some syrup until it tasted right, cut up the hotdogs, and bring to a boil. My son also wanted more precise instructions when he called me the other day so I decided it was time to write down a recipe for my pork and beans.

My Five Minute Pork N Beans dish is perfect for picnics or family reunions, but is also great year round with its old fashioned taste of homemade baked beans. You can add fried hamburger or bacon for an extra special meat lover’s delight or pop the pork and beans into the oven baking for a couple of minutes to produce a crusty top. Five Minute Pork N Beans is good to eat hot or cold and make great leftovers- if there are any left over. You might want to double the recipe. Preparation time for my Five Minute Pork N Beans is only five minutes and this recipe serves six.

Five Minute Pork N Beans

2 (16 oz) cans of pork & beans (any brand)
1 (12 oz) pkg hot dogs (any brand) cut into ½ inch pieces
¼ c catsup
¼ c brown sugar
¼ c dark syrup or molasses
1 tsp mustard

Mix all the ingredients together in a large microwaveable bowl. Heat in the microwave for five minutes. Stir and serve. You can garnish with bacon bits if desired!

Weekly tip: Whenever measuring brown sugar for a recipe always pack the brown sugar firmly in the measuring cup!

Dorcas Annette Walker is a published author, columnist, speaker, freelance magazine writer, and photographer from Jamestown, Tennessee. Contact her at: dorcaswalker@twlakes.net. For more recipes check out her Creative Tennessee Mountain Cookin blog at: www.dorcasannettewalker.webs.com