Tuesday, January 29, 2008

Cheesy Bacon Potato Soup


Cheesy Bacon Potato Soup
Dorcas Annette Walker

The snow is falling outside my widow up here in the mountains turning the world into a dazzling white landscape. It is another perfect day for bowl of hot soup. I hear the crackle of the wood burning in my woodstove as it spreads warmth throughout my house. The hot days of summer seem far away on this cold January morning.

Potato soup recalls to memory when we used to plant a fifty pound bag of seed Kenny Beck Irish potatoes. My husband declared there was no better potato around. We tried another brand one year that didn’t do any good- whether it was due to the weather or the fact that we never bothered to plant by the signs I’ll never know as from then on all we planted was Kenny Beck’s. Around here mountain folk religiously plant their gardens by the signs of the moon. My husband always has several major things going at once. While pastoring a church he also took revival and camp meetings with a few tent meetings thrown in, not to mention being active in the conference, which meant usually being on some board. So gardening was not at the top of his list of priorities. Instead we planted our garden whenever he had a day off. I’ll never forget one year when I mentioned to Dana one night at supper that we needed to get our potatoes in the ground as it was getting up in the season and everyone else had planted their potatoes. We were going to leave the next day and be gone the rest of the week. Dana agreed and said that he’d go out and till the ground while I cut up the seed potatoes. The sun was setting by the time we were halfway through. Undeterred I went and got the biggest flashlight we owned and we kept planting potatoes. The next thing I knew our neighbor arrived. Preacher, what in the thunder are you a’doing out here in the middle of the night in your garden? The poor guy was thunderstruck when Dana told him that we were planting our potatoes. Why, Preacher, those potatoes won’t do any good. It’s not the right sign to be planting potatoes now. I can’t remember if the moon was turned up or down as we barely glanced at the moon above us intent on getting our potatoes in the ground. As soon as potato plants appeared I began to hill them up. I was almost done when our neighbor walked over. Honey, what in the world are you a’doing now? You’re going to smother those plants. He was amazed that any potato plants had even appeared. When I hilled my potatoes up the third and fourth time our neighbor was Johnny on the spot. It seemed like he couldn’t stay away. He’d stand at the end of the garden shaking his head and muttering. Those sure a beautiful hills you’re a’makin. It’s a crying shame that you won’t get any potatoes after all the work you’ve put into them. Needless to say he kept close tabs on when we planned to harvest. There was more head shaking at Dana’s casual answer that he’d dig the potatoes whenever he got the time. Summer and autumn that year was busier than our spring had been. I was hard put freezing and canning our garden produce. The nights were getting cold by the time Dana decided to dig our potatoes. I bundled myself and the kids up and went out to the garden with five gallon buckets. Our neighbor was there as Dana dug in the first hill with his shovel. Out rolled the most beautiful batch of large potatoes I had ever seen. I hid a smile as our neighbor began sputtering. Preacher, if I wasn’t seeing it with my own eyes I’d never believe it. Of course a man’s bound to get one good row of potatoes out of Kenny Beck’s. As the kids and I filled the buckets our neighbor followed us down every row. When all the potatoes were finally dug our neighbor was still snorting and shaking his head. Preacher it doesn’t make any sense. Here you go and don’t bother to follow the signs and yet you get a bigger and better crop of potatoes than I did. The good Lord is sure looking out for you. Did you say you planted Kenny Beck’s? I’ve heard when nothing else grows they will. Personally I figured it was a little bit of both.

My Cheesy Bacon Potato Soup is a creamy filling soup that is quick to make using frozen hash browns, yet has the same homemade taste as regular potatoes. For a main meal you can serve Cheesy Bacon Potato Soup with a grilled cheese sandwich adding bacon or ham lunchmeat. For a different twist you could start with a one-half package of frozen broccoli, cauliflower, and carrots and mash when cooked. This recipe of Cheesy Bacon Potato Soup takes thirty minutes to prepare and serves six.

Cheesy Bacon Potato Soup

Brown two slices of bacon in a microwave and set aside.
In a large saucepan bring to a boil:
4 c hot water
1 (12 oz) can evaporated milk
4 frozen hash brown patties (crumbled)
1 tb chopped dried onion
½ tsp salt
Add:
crumbled bacon
¼ (32 oz) Velveeta or processed cheese block cut up into chunks
Simmer until melted stirring frequently. Garnish with fresh parsley or crumbled bacon!

Homemade Chicken and Dumplings


Homemade Chicken and Dumplings
Dorcas Annette Walker

The mountain style of dumplings is quite different from what my Grandmother used to make. Her dumplings were spoonfuls of batter dropped in boiling broth that puffed up like biscuits. What I grew up making known as pot pie is actually the Southern style of dumplings used with chicken. You will always find a big pot or two of Homemade Chicken and Dumplings at any gatherings. Interesting enough I’ve noticed in older recipe books that you don’t find any recipes for Homemade Chicken and Dumplings. Any girl worth her salt grew up making them.

My husband has always wanted to raise chickens. It was an idea I always vetoed as the kids were growing up, we were constantly traveling, and knowing my husband a couple chickens would soon multiply into a family operation. Our family cats, two dogs, my goldfish outside, and the bird feeders I maintain keep me busy enough. Now that our kids were grown and we were more homebound due to my health, Dana, once again began to talk about raising chickens. He’d get only three or four and enclose them in wire fence that would be easy to move around. So I wasn’t too surprised one day when he came home with two brown hens and some wire. After thinking it over my husband decided that the fence needed a top on it, which necessitated a small door in the side. Then he had to strengthen the sides and bottom with boards. It was quite a lovely pen. The only problem was it was quite heavy to move. My husband decided a small shed would be just the thing. Of course the wire pen ended up being enlarged to almost four times its size to fit to the side of the shed that turned into an 8 x 8 foot building. By now the two brown hens I had named, Henny and Penny had company. Dana bought four other smaller hens- he couldn’t resist a bargain- and one rooster of a mixed breed. A couple of months passed when I noticed something strange. Instead of one rooster crowing there was four! So Dana traded three roosters for three Dominique hens to add variety to his flock. Somewhere along the line Chicken Little disappeared. Don’t tell anyone, but Dana is beginning to suspect that one of the Dominique hens is also a rooster. Keeping that in mind I’ve named two gray speckled hens, Emma and Agnus. Winter weather arrived up here in the mountains and our dear hens quit laying eggs. I told my husband I wouldn’t think of laying eggs in freezing weather either if I was a hen. So Dana rigged up a light via extension cords to the hen house and installed a heat lamp along with layers of straw for comfort. In gratitude our dear hens began laying again. To be perfectly honest they should as much as we pamper them with daily scraps. I had just relaxed my guard when Dana began talking about incubators. I told him that I thought that’s what we had hens for. Well it turns out that it isn’t that simple. Three of our hens are laying eggs in one nest and the rate of eggs hatching with hens is not near as good as if you incubate them yourself. He already had the stuff out in his workshop that he could use to put together an incubator and it wouldn’t be any trouble at all. Of course once it was built instead of waiting until spring Dana had to try it out. Right now four eggs are resting in the incubator in my sunroom. Not only do the dear eggs have to be turned at least twice a day, but depending on how the weather fluctuates we have to switch from two forty light bulbs to sixty watt too keep an even temperature. Oh yes, did I mention that my husband has just left for couple of days to go to a prayer retreat? Guess who gets to baby-sit the hens and eggs? I always thought it was rabbits that multiplied not chickens. My husband’s rabbits though are another story.

Homemade Chicken and Dumplings

Cover 4-5 pounds of chicken with water in a large pan with one tablespoon of salt. Boil until soft (about 1 hour).
Remove chicken and cool. Then de-bone the chicken, cut into small chunks, and add to broth. Bring broth back to a rolling boil and add:
1 pkg chicken gravy
2 tb cornstarch
Stir until slightly thickened.

Dumplings:
1 c self rising flour
1 egg
¼ c milk
Mix together until you have stiff dough. Roll out very thin on a floured surface. Cut into strips with a pizza cutter. Drop dumplings into the boiling broth one layer at a time making sure that the dumplings are covered with broth to prevent sticking together. Sprinkle salt and pepper and simmer for fifteen minutes. Serve hot with mashed potatoes or cornbread. May garnish with fresh parsley!

Tuesday, January 15, 2008

Iron Skillet Beef Stew


Iron Skillet Beef Stew
Dorcas Annette Walker

Homemade stew is among the many different soups that I make during the winter months. I always keep carrots on hand and whenever I don’t know what to make I’ll cook up a batch of stew. Homemade stew is quick and easy to make, along with being a healthy dish. In fact growing up I was always told to eat my carrots as they were good for my eyes. Knowing that carrots are healthy still didn’t prepare me for the wealth of information that is available about carrots.

Carrots date back to the 7th century when they were found cultivated in Afghanistan ranging from purple, white, pale yellow, red, green/yellow, and even black. The Romans often ate carrots raw, in oil, salt, and vinegar or cooked them with a sauce. By the 13th century carrots were being grown in fields, orchards, gardens, and vineyards in Germany and France. It wasn’t until the 15th century that Dutch scientist developed orange carrots in honor of the House of Orange, the Dutch Royal Family, when carrots became orange. In the 16th century carrots were started to be used as flavoring for meat dishes rather than as main vegetable. European voyagers carried the carrot seed to America soon after discovering the New World. The struggling colonists grew carrots at the first English settlement in Jamestown, Virginia in 1609. Plants were grown from seed and soon the plants escaped into the wild, which became known as Queen Anne’s lace. In the reign of James I it was fashionable for ladies to decorate their hats and clothes with the lacy green foliage in place of feathers. Thomas Jefferson raised several types of carrots in his Monticello garden. Today there are festivals world wide that celebrate carrots as well as museums and many collectors of carrots. Carrots are found in art and science including several major works of 17th century Dutch masters art. There has been a controversy whether carrots are a fruit or vegetable. Today carrots are considered biennial, flowering in the second year above ground. Carrots are a good source of vitamin A, helps our body resist infection, and lowers cholesterol levels 20 percent just by eating two carrots a day. There is as much calcium in nine carrots as there is in a glass of milk and three carrots will give you enough energy to walk three miles. One pound of carrots gives a normal man enough energy to raise 64 tons one foot in the air, produce one ounce and eleven grains of sugar, and contains fourteen ounces of water. You can buy raw carrots year round. Storing them in the refrigerator will preserve their flavor, texture, and beta carotene content. Carrots are actually more nutritious when cut by a knife and cooked rather than eaten raw. The average person will eat 10,866 carrots in his lifetime. Carrots are good for dandruff and large raw carrots make excellent baby teethers. In traditional St Patrick’s Day parades in the USA carrots and cabbages are thrown from floats and it is considered lucky to catch one. So if you don’t have any carrots in your refrigerator, be sure and stock up next time you shop.

My Iron Skillet Beef Stew is a well balanced meal served with hot corn bread or muffins. My recipe is simple to make using only a large iron skillet that helps flavor the vegetables and beef as they simmer in rich gravy. Preparation time for the Iron Skillet Beef Stew is about an hour and this recipe serves six.

Iron Skillet Beef Stew

1 lb beef tips cut into inch pieces
Roll beef pieces in flour and brown in shortening in the bottom of a large iron skillet. Sprinkle with garlic salt, regular salt, pepper, and one tablespoon of dried onion.
Add:
6 c water
2 c carrots (sliced or baby carrots cut in half)
3 c potatoes (cubed in inch pieces)
1 tsp salt
1 tsp dried parsley leaves
1 tb crushed dried celery leaves
Bring to a full boil and cook until the vegetables are tender- about 30 minutes- stirring occasionally to prevent sticking.
Then stir in:
1 pkg brown gravy mix
Bring back to a boil until thickened. Garnish with fresh parsley and serve!

Weekly tip: Cut up your leftover beef roast into any leftover gravy and freeze to use for your next batch of stew!

Dorcas Annette Walker is a freelance writer, author, columnist, and photographer from Jamestown, TN. If you have any cooking tips or favorite recipes you are welcome to contact me by mail at: Dorcas Walker, 929 Wildwood Lane, Jamestown, TN 38556 or email me at: dorcaswalker@twlakes.net For more information about the Walker family and Dorcas’ books check out her website at: www.dorcasannettewalker.com or htpp://dorcasannettewalker.blogspot.com for other Creative Mountain Cookin recipes.

Butter Bean Soup


Butter Bean Soup
Dorcas Annette Walker

After all the holiday desserts of December I thought I’d start the New Year off with a warm tasty soup as the temperatures outside plunge downward. Chilly winter days find me cooking in my kitchen either popping something into my oven or making a pot of soup when I’m not hovering close to my woodstove. It was on such a day that I first made up a pot of Butter Bean Soup while winter winds howled outside my kitchen window. Weeks earlier someone from the church, where we were pastoring at the time, had given us several cans of butter beans and I was scurrying around making Sunday dinner for some unexpected company at the parsonage when I decided to add butter beans to the menu to help round out the meal. As I cooked the lady guest read all the labels counting up calories for her diet when she suddenly called my attention to a recipe printed on the back of a can of butter beans. She was impressed with the low calorie count while I was intrigued with the idea of a new recipe. I decided to try and make some Butter Bean Soup. The original recipe contained only vegetables. My husband is a meat eater and I wanted the soup to be a bit more filling so I started with browning some hamburger. I soon had a mouth-watering aroma simmering on my stove that drew my husband into the kitchen to see what I was cooking up.

Butter Beans are grown for its dried seed but eaten as a vegetable. The term butter bean is widely used for a large, flat, and white variety of lima beans. The difference between butter beans and lima beans is based on the size of the pods and seeds. The first variety is a large slightly curved flat green bean known as the lima bean while the second type has smaller seeds known as butter beans. The small-seeded butter beans tolerate more heat but are harder to shell. Lima and butter beans with speckled seeds have a stronger taste than the white or green varieties. Butter beans are more commonly grown in Mexico where they are harvested from seedpods. They have tiny amounts of fat, are higher in iron, and slightly higher in calorie count than limas. You can find fresh butter beans from late spring through the early parts of summer, although canned butter beans are more common. Butter beans are strictly a southern cooking term and there are even recipes for butter bean pie, which they say has a similar consistency and taste as a sweet potato pie. Now that I would have to see for myself!

Butter Bean Soup is not only a nutritious addition to your menu but is colorful as well. This filling soup served with hot corn muffins and stuffed celery stalks will satisfy even a man-sized appetite. My Butter Bean Soup takes about an hour to prepare and serves eleven.

Butter Bean Soup

Brown ½ lb of hamburger. Sprinkle garlic salt, regular salt, and pepper on meat as it browns along with 1 tb of chopped dried onion.
Add:
2 cans diced tomatoes
2 cans butter beans
½ tsp salt
In a blender cover with water and chop:
2 cups of carrots peeled and sliced
2 cups of fresh celery
Pour into soup, bring contents to a boil, and simmer for twenty minutes. Serve hot. Garnish with parsley or fresh celery leaves!

Dorcas Annette Walker is a freelance writer, author, columnist, and photographer from Jamestown, TN. If you have any cooking tips or favorite recipes you are welcome to contact me by mail at: Dorcas Walker, 929 Wildwood Lane, Jamestown, TN 38556 or email me at: dorcaswalker@twlakes.net For more information about the Walker family and Dorcas’ books check out her website at: www.dorcasannettewalker.com or htpp://dorcasannettewalker.blogspot.com for other Creative Mountain Cookin recipes.

Friday, December 28, 2007

To help welcome in the New Year I thought I’d give a couple of last minute treats that you can make to eat as you wait for the New Year to arrive. I plan to spend New Year’s Eve by my cozy woodstove fireplace curled up nearby in my recliner with a book. I’ll leave the partying to the rest of you as I enjoy a quiet evening relaxing by the fire- my favorite way of welcoming in the New Year. Have a great New Year filled with lots of culinary delights!


I discovered a quick and easy treat that I quickly whipped up for the holidays. These Marbled Chocolate Treats take only ten minutes to prepare and are delicious to nibble on. Marbled Chocolate Treats have a crunchy texture with a rich chocolate topping. My Marbles Chocolate Treat recipe makes eighteen treats.

Marbled Chocolate Treats
1 pkg Honey Graham Crackers
6 squares Baking Chocolate
½ c peanut butter (I used crunchy)
3 squares White Baking Chocolate
Line a 9 x 13 baking dish with tinfoil extending over the sides. Arrange graham crackers on the bottom until completely covering. Microwave the peanut butter and six squares of baking chocolate until melted (about 1-2 minutes). Stir until well blended then pour over the graham crackers spreading with a spatula until completely covered. Melt the white chocolate and drizzle over the top of the dark chocolate. Cut through the chocolate mixture with a knife to make a marbled effect. Refrigerate for one hour until firm. Turn over and let the chocolate come to room temperature before cutting along the graham cracker lines. Store the treats in an airtight container!


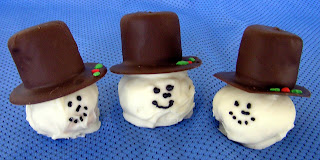
For the last couple of Christmas holidays my daughter, Dawn, has made adorable snowmen that you can eat. These eye-catching treats are irresistible to kids and adults alike. With a soft marshmallow hat covered in chocolate combined with a chocolate covered mild peanut butter head these Winter Snowmen treats will disappear fast. This recipe of Winter Snowmen takes about a half an hour to prepare and makes twelve snowmen.

Winter Snowmen
Snowmen Hats:
12 large marshmallows
6 squares of Baking Chocolate
Toothpicks
wax paper
candy leaves and berry sprinkles
Insert a toothpick on either side of a large marshmallow, dip into melted chocolate until well covered, and place on wax paper. Slowly swirl the marshmallow on the wax paper until you make a half-inch puddle of chocolate in a circle half an inch larger than the marshmallow. Center the marshmallow and take out the toothpicks. Decorate hat brims with candy leaves and berry sprinkles. Let cool and harden.

Snowmen heads:
1 c peanut butter (creamy)
½ c marshmallow cream
½ c powdered sugar
Mix together thoroughly until the consistency is dry yet clumps together. Add more powdered sugar if the dough is too sticky or more peanut butter if your dough won’t stick. Shape into inch size balls.
Melt in a microwave six squares of white chocolate until melted and dip the heads into the melted chocolate with a spoon until covered. Place on wax paper and let cool until hardened.
Use a small amount of melted chocolate (either flavor) to glue the hats and snowmen heads together. Decorate the snowmen’s faces with chocolate icing or black gel to make eyes, nose, and a smiley mouth. Store snowmen in an airtight container!

Weekly tip: A holiday tip to help speed up your meal serving time: place food into serving bowls and cover with saran wrap with the serving utensil as soon as they are prepared. Cold dishes can be refrigerated until time to sit on the table while hot dishes can be kept warm on the stove or in the microwave. When ready to serve your meal it will take only a couple of seconds to transfer your dishes to the table!

Dorcas Annette Walker is a freelance writer, author, columnist, and photographer from Jamestown, TN. If you have any cooking tips or favorite recipes you are welcome to contact me by mail at: Dorcas Walker, 929 Wildwood Lane, Jamestown, TN 38556 or email me at: dorcaswalker@twlakes.net For more information about the Walker family and Dorcas’ books check out her website at: www.dorcasannettewalker.com or htpp://dorcasannettewalker.blogspot.com for other Creative Mountain Cookin recipes.

Ten Minute No-Fail Fudge


Ten Minute No-Fail Fudge
Dorcas Annette Walker

My memories of fudge and candy making are few and far between. I know one reason for this is because the process always entailed what seemed like hours of time hanging over a saucepan faithfully stirring to keep the ingredients at the right temperature and avoiding scorching until arriving at the correct processing time by dribbling a bit of hot liquid into a cup of cold water, which then gave way to intense concentration to see if a soft or hard ball appeared. For some reason the end result was either too runny or hard enough to crack one’s teeth. When it comes to cooking candy or anything mechanical I remain hopelessly jinxed. It’s definitely a faulty gene passed down to me from my mother. All the work involved never seemed worth the pathetic results. You can never accuse me of being a quitter though. Every couple of years as my memory would dim from the last candy making disaster, a mouth watering picture of delectable pieces of candy would catch my attention always accompanied with another easy or no-fail recipe and I’d find myself once again in my kitchen hovering over a boiling pot sure that this time my candy would turn out perfect.

One candy making memory remains permanently etched on my brain cells in neon lights. While still living on the college campus where my husband attended school, I somehow became involved with a staff yearbook committee. On one such occasion I had the brainstorm of making homemade lollypops. The recipe seemed quite simple and I figured that if I could turn out four pies a week making lollypops would be a breeze. I faithfully stirred and cooked and then poured the hot candy into my molds. When it came time for the staff meeting my lollypops were still kinda gooey, but always optimistic I took them along figuring they would make a conservation piece if nothing else. Little did I realize what historic proportions my homemade lollypops would create. Everyone greeted my lollypops with pleasure sticking them into their mouth as they were passed along the table. Once in one’s mouth though it took jaw-breaking work to get your teeth unstuck from the candy. Everybody became occupied trying to un-stick their teeth from the candy to do much business. It was the shortest and quietest staff meeting in the entire history of the school.

My Ten Minute No-Fail Fudge recipe is not only delicious, but also healthful. It is similar in process to the after dinner mints that I make and when I say it is a no-fail recipe you can count on it to turn out beautifully for your holiday festive gatherings. Ten Minute No-Fail Fudge involves only ten minutes of your time and one batch makes twenty-four pieces of good size fudge about an inch thick. My recipe of Ten Minute No-Fail Fudge can make either chocolate or peanut butter fudge.

Ten Minute No-Fail Fudge

Melt in microwave for about four minutes at one minute intervals stirring between times until completely melted:
¼ box of a 2 lb box of Velveta (or store brand) process cheese spread cut into small chunks
1 stick of margarine
If making peanut butter fudge also include: 1 c peanut butter (I used chunky)
When completely melted add:
1 tsp vanilla
Pour mixture into:
2 lbs powdered sugar
If making chocolate fudge add to powdered sugar:
1 c cocoa powder
1 c chopped nuts (your choice)
Stir and then mix together with your hands until completely combined. Place fudge in a waxed 9 x 13 dish. Use a small rolling pin to smooth out the top. When cool cut into inch pieces and serve on a decorative holiday dish!

Dorcas Annette Walker is a freelance writer, author, columnist, and photographer from Jamestown, TN. If you have any cooking tips or favorite recipes you are welcome to contact me by mail at: Dorcas Walker, 929 Wildwood Lane, Jamestown, TN 38556 or email me at: dorcaswalker@twlakes.net For more information about the Walker family and Dorcas’ books check out her website at: www.dorcasannettewalker.com or htpp://dorcasannettewalker.blogspot.com for other Creative Mountain Cookin recipes.