Showing posts with label Candy. Show all posts

Saturday, January 10, 2015

Happy New Year


Cocoanut Chocolate Balls


It has been ages since I did up a cooking article for any blog or newspaper so this New Year- while going through my end-of-the-year organization and realizing my pile of recipes to try and new cooking ideas had reached an alarming all time high stack- to do up and post a new recipe once a month.  You’ll notice I didn’t go for once a week- ha!


I thought I’d start out the New Year with my Cocoanut Chocolate Ball recipe that I made for the last couple of Christmas seasons. My Cocoanut Chocolate Ball recipe is perfect during the holiday rush as there are only three ingredients and it only takes a short time. This recipe came about while I was looking at a colorful magazine drooling over all the delicious looking pictures of candy that they sold.  Anything chocolate especially catches my eye. I casually looked at the advertisement beside these Cocoanut Chocolate Balls when I did a double take reading that cocoanut and chocolate covered a marshmallow center.  I knew instantly that I could make up a batch of Cocoanut Chocolate Balls myself.  So I made some Cocoanut Chocolate Balls that Christmas and they were an instant success- not only in how good they tasted, but how easy it was to fit them into my hectic schedule of finishing wrapping gifts.  My Cocoanut Chocolate Balls are simple to make and would fit anywhere year round when you need something quick to make.  


Cocoanut Chocolate Balls


14 oz bag of shredded cocoanut

10 oz bag of regular marshmallows

2 lb of dark chocolate squares

wax paper

In one small bowl pour ¼ bag of cocoanut. In another bowl break off a couple squares of chocolate and microwave for thirty seconds to a minute stirring until melted. Place one marshmallow in the melted chocolate and with a fork roll it around until covered, lift out, and put into the cocoanut.  Turn over until coated with cocoanut and then lay on wax paper. Repeat until all the marshmallows are used up. Let the Cocoanut Chocolate Balls harden and enclose in a covered plastic container. Total time is fifteen to thirty minutes.


Tip: For an added holiday look and taste crush some peppermint candy canes into small pieces and add to the shredded cocoanut!

Wednesday, December 14, 2011

Chocolate Peanut Nuggets


Chocolate Peanut Nuggets
Dorcas Annette Walker

Have you ever had a day when it seems like everything goes wrong? I had a “Calamity Jane” Saturday this past week. For some reason my dear hens decided somewhere along the way to go modern and stage an attack on my large white rooster that is twice as big as them. My “women libber” hens kept pecking and pulling feathers off of the rooster until they had intimidated the poor fellow to where he hid in the henhouse. Nothing deterred the hens no matter what I sprayed on or did to the dear boy to help him get his self esteem back. I finally decided Saturday afternoon that I had to move my rooster before the hens did him in. So putting on some old clothes and gloves I girded myself for the battle of catching my turkey-sized rooster. Feathers and straw flew everywhere with me biting the dust more than once until I managed to corner and catch the dear boy. By the time I put him into a large feed stack and deposited him in another pen I was out of breath. A couple of hours later I tripped over the small fence around my herb garden while gathering some chives for supper and landed flat on my face in the dirt again. By then my bones were definitely protesting. I dusted myself off and limped into the house for a cup of tea. As dusk settled in I went back outside to help my son get some firewood. We had made a couple of trips and were on our last load- Dwight pushing the wheelbarrow ahead of me- when I reached over and picked up the handle on my wagon to leave the woodpile. Just as I was getting ready to pull the wagon I heard a loud noise and looked up in time to see a dead tree falling in my direction. I screamed and totally froze. The tree twisted and thankfully landed on the workshop standing next to me. Dwight raced back in wide-eyed disbelief. I moved my body and wagon to safety while he pushed the tree over enough for it to crash onto the ground. I tell you once I got back into the house there was nothing that was going to get me out of the door again that day.

So this week I decided to do something simple and made up a batch of my Chocolate Peanut Nuggets. You can mix-match nuts, add dried fruit and/or rice crispies, or substitute white chocolate for dark. Also using decorative candy or cupcake papers will make the Chocolate Peanut Nuggets a perfect homemade candy Christmas gift. Preparation time for my Chocolate Peanut Nuggets is around twenty minutes and this recipe makes three dozen nuggets.

Chocolate Peanut Nuggets

2 lbs dark chocolate almond bark
1 (16 oz) jar of dry roasted peanuts
1 tsp almond flavoring
1 tsp vanilla extract

In a large bowl microwave the chocolate until melted. Stir in the flavorings and peanuts. Drop by large tablespoons into candy or cupcake papers in muffin pans. Chill in the refrigerator or freezer a few minutes until hard. Store in an airtight container!

Weekly tip: To help make it easier and less of a mess to get the melted candy into the papers to harden, use a table knife to first push the paper down into the muffin pan before dropping in the candy mixture!

Dorcas Annette Walker is a published author, columnist, speaker, freelance magazine writer, and photographer from Jamestown, Tennessee. Contact her at: dorcasannettewalker@gmail.com For more recipes check out her Creative Tennessee Mountain Cookin blog at: www.dorcasannettewalker.webs.com

Wednesday, December 7, 2011

Holiday Cake Truffles


Holiday Cake Truffles
Dorcas Annette Walker

This year for my birthday I decided to make Holiday Cake Truffles instead of a birthday cake. I’ve been reading about these intriguing cake truffles that seem to be all the rage. It turned out that I didn’t get my Holiday Cake Truffles made for my birthday on Monday like planned as I ended up back in the hospital with my husband instead. I was out in the living room in my recliner relaxing Sunday evening when I heard my husband go into the bathroom. A minute later there was a loud noise and I realized that Dana had fallen. I raced to the bathroom in time to help my husband get up and sit on a nearby chair. I told Dana to sit still thinking that maybe he had taken a dizzy spell and ran to get my son. By the time I got back my husband he was standing, took a step, and started to fall. I tried to hold onto him, but it was like trying to stop a falling tree as Dana is taller and weighs twice as much as me. To my horror my husband hit the floor again. By then Dwight had arrived so he helped me get his dad up off the floor and with us both holding onto Dana we tried to walk him to his recliner. Dana had barely taken three steps when he passed out again. We lowered my husband to the floor, put a couple of pillows under his head, and patting his cheek while calling his name I got Dana to respond. His pulse was thready and rapid so telling Dwight not to let his dad get up, I ran to call 911. With the assurance that an ambulance was on the way, I ran around getting dressed- as I didn’t want to make a grand entrance at the hospital in my PJ’s- while keeping an eye on Dana trying to convince him to lie quiet as he was all confused. My husband was admitted and finally taken to his hospital room around midnight. Around 1 o’clock in the morning back home I collapsed into bed feeling my age and thinking, what a way to start a birthday.

These Holiday Cake Truffles are a scrumptious temptation with their soft inner cake core coated by a shell of hardened chocolate that can be made into zillions of ways. You can use any flavor of cake mix (I used lemon) and frosting then coat with melted candy, white or dark chocolate and even put these balls on sticks for holiday lollipops. The Holiday Cake Truffles can be garnished with crushed nuts, peppermint, sprinkles, mini holiday candies, and rolled in powdered sugar or cocoa. Whether plain or fancy these Holiday Cake Truffles will be an elegant addition to your holiday celebration. Preparation time (not counting freezing time) is around thirty minutes and this recipe makes twenty-eight cake truffles.

Holiday Cake Truffles

lemon cake mix
1 c vanilla frosting
1 lb chocolate almond bark
candy sprinkles & powdered sugar

Bake cake mix according to the directions, cool, and then remove from the pan and crumble. Add frosting and mix with a beater on low speed until combined. Roll into 1½ inch balls and place on a wax papered cookie sheet. Freeze for one hour to set. Melt chocolate in the microwave until runny and completely cover the cake balls. Garnish with sprinkles before the chocolate hardens or roll in the powdered sugar after the chocolate sets!

Weekly tip: Another way to cover candy or a cake truffle with melted chocolate instead of dipping is by using a teaspoon and pouring it over the top, swirl around, let harden, and then ice the bottom!

Dorcas Annette Walker is a published author, columnist, speaker, freelance magazine writer, and photographer from Jamestown, Tennessee. Contact her at: dorcasannettewalker@gmail.com For more recipes check out her Creative Tennessee Mountain Cookin blog at: www.dorcasannettewalker.webs.com

Wednesday, December 22, 2010

Peanut Butter Brittle


Peanut Butter Brittle
Dorcas Annette Walker

How well I remember snow days when my children were small. It seemed like an endless parade: wet mittens, coats, and muddy floors, getting everyone all wrapped up and outside to play only for them to turn around and come back inside. By noon the excitement of no school had worn off and my little angels would start to snarl at each other like tigers. I found the best remedy was to get out some bowls and spoons and begin making up a batch of cookies. Even if the camel’s heads were a bit lopsided and the recipe made only half the amount- thanks to little fingers sampling the cookie dough- it kept my kids occupied and happy. Not only did we make memories together, but I ended up with Christmas cookies. Whenever frigid winter winds are howling outside, there is something comforting about working in my kitchen. I always like to stock up ahead on items needed for holiday baking so I don’t have to venture out when bad weather hits. This week during a snowstorm, I made up a batch of Peanut Butter Brittle.

Don’t think I’m bragging, but my family and I believe that my homemade Peanut Butter Brittle is quite superior to any store bought. The other year when I first made up a batch I thought it had flopped when it didn’t turn out rock hard. The candy tasted delicious and disappeared so fast- not to mention being easier to chew- that I had to make up another batch. This year I made a double batch and before it had even hardened my husband and son were trying to snitch some. With a success like that I don’t care if my Peanut Butter Brittle never gets teeth-busting hard. Don’t get discouraged or give up if a recipe doesn’t turn out perfect. You may accidently stumble onto a brilliant idea.

My Peanut Butter Brittle is a quicker version of the cooked one and easy to do making a perfect gift idea when wrapped in a Christmas tin. You can substitute almonds for peanuts or any use other nuts, and replace one cup of honey for one cup of sugar. Make on a dry day as humidity tends to make the finished product sticky. Use pot holders or oven mitts when handling as the candy will be very hot. Preparation time for my Peanut Butter Brittle is around six minutes (depending on the wattage of your microwave cooking time may vary) and this recipes makes close to 2 lbs.

Peanut Butter Brittle

3 c sugar
3 c peanuts
1 c light corn syrup
¼ tsp salt
2 tsp vanilla extract
2 tb margarine
2 tsp baking soda

In a microwave-proof bowl, microwave on high for four minutes (stirring halfway) the sugar, peanuts, corn syrup, and salt. Mix in vanilla and margarine and microwave for two more minutes or until runny. Add baking soda and stir until the mixture becomes light and foamy. Pour onto two large cookie sheets covered with wax paper and spread the candy to about ¼ inch thick. Let completely cool. Turnover and break with a hammer. Peel off wax paper and store candy in an airtight container!

Weekly tip: If you are a chocolaholic, who thinks a bit of chocolate makes everything taste better, melt a couple squares of chocolate or some chocolate chips in the microwave, dip the ends of the Peanut Butter Brittle into it, and let harden for some one-of-a-kind candy!

Dorcas Annette Walker is a published author, columnist, speaker, freelance magazine writer, and photographer from Jamestown, Tennessee. Contact her at: dorcasannettewalker@gmail.com For more recipes check out her Creative Tennessee Mountain Cookin blog at: www.dorcasannettewalker.webs.com

Wednesday, December 8, 2010

Old Fashioned Soda Cracker Fudge


Old Fashioned Soda Cracker Fudge
Dorcas Annette Walker

This month I will be giving recipes ideal for holiday treats or gift giving. Every year around Christmastime I set aside a day in my kitchen baking cookies and cooking candy. With holiday music soaring in the background and scrumptious goodies filling up my counters, Christmas for me really begins. I love giving homemade gifts of cookies and candy to friends and neighbors; something that quickly became a Christmas tradition for our household. In today’s fast-pace society of readymade items lining the shelves of the stores temping one to take shortcuts, Christmas is a wonderful opportunity to slow down enough to set aside some time to have a family night or friend get-to-gether with homemade food. While glittering lights and holiday sales try to tempt one to spend beyond their budget, why not determine to center this Christmas season on family and friends instead of commercialism? Instead of expensive presents, why not give the gift of time and something homemade? Expensive presents can never substitute for sharing oneself.

Fudge is usually a very sweet and extremely rich type of candy often flavored with chocolate. Even though there is no record of when fudge was first invented, fudge is believed to have been the result more than one hundred years ago of an accidental “fudged” batch of caramels as both caramel and fudge are cooked at a very high temperature and need lots of stirring. Fudge quickly became popular, especially on college campuses. Soda cracker fudge or peanut butter cracker fudge originated by using what one had on hand during the depression era. Another widespread item was cracker candy made by layering crackers on the bottom of a foil-lined pan, pouring the boiled ingredients over the crackers, baking for five minutes, chilling in the refrigerator until set, and then broken into pieces.

My Old Fashioned Soda Cracker Fudge is a simple and easy recipe to make that can use various ingredients for different twists. You can add one cup of butterscotch morsels, chopped walnuts, or pecans to this recipe or for chocolate fudge add: one (12 oz) bag of chocolate chips and substitute brown sugar for white then sprinkle on crushed peppermint candies. The possibilities are endless. Preparation time for my Old Fashioned Soda Cracker Fudge is around ten minutes (not counting cooling time) and this recipe makes about a dozen, one-inch pieces of fudge.

Old Fashion Soda Cracker Fudge

2 c sugar
½ c milk
5 tb crunchy peanut butter
1 (7 oz) jar marshmallow crème
24 saltine crackers

Crush crackers in a blender and line in a buttered 9 x 13 inch pan. In a small saucepan bring sugar, milk, peanut butter, and marshmallow crème to a boil and cook for five minutes stirring constantly with a Wisk. Pour over crushed crackers making sure all the crackers are coated. Let cool until set then cut into one-inch pieces. Store fudge in a tight container as it will last a long time- if not eaten first!

Weekly tip: To get marshmallow crème out of the jar without a big mess first dip a large spoon into hot water repeating as necessary. This will cause the marshmallow crème to slide out of the jar and off the spoon with ease!

Dorcas Annette Walker is a published author, columnist, speaker, freelance magazine writer, and photographer from Jamestown, Tennessee. Contact her at: dorcasannettewalker@gmail.com For more recipes check out her Creative Tennessee Mountain Cookin blog at: www.dorcasannettewalker.webs.com

Friday, July 31, 2009

Rose Mints


Rose Mints

Dorcas Annette Walker


Summer is the main season for weddings. It is exciting and joyous to see a couple exchange vows to cherish each other for life after months of preparation. This year our son is getting married. Once more I am in a whirl of activities planning a wedding shower. What started at my sister’s wedding and has become a tradition in any weddings for our family is my Rose Mints. Every time I make my Rose Mints I’m always asked for the recipe.


As a young child, I was always fascinated by the after dinner mints that were handed around at the end of my grandmother’s yearly Christmas formal dinners. The sight of those large square white mints sitting on a fancy glass dish that melted in one’s mouth always mesmerized me as they were slowly passed around the table. No matter how stuffed one was there always was room for an after dinner mint. I promised myself that when I grew up and had a home of my own I would always end a fancy meal with after dinner mints.


Not long after I was married, I was thrilled to discover a recipe for homemade mints and began experimenting. When I found a store that carried rubber candy molds I began producing hundreds of Rose Mints in all colors. Homemade mints add a finishing touch to weddings, baby showers, graduations, and birthday celebrations. You can find different shaped rubber candy molds at craft stores to use for other holidays as well.


My Rose Mints are decorative. These bite-size confections that melt in one’s mouth are irresistible with their mild peppermint flavor and a smooth creamy texture. You can substitute almond flavoring instead of peppermint for a different taste. Any leftover mints can be stored in the freezer. Just let the mints thaw out before serving. This Rose Mint recipe makes 5½ dozen mints and takes about 30 minutes.


Rose Mints


1 lb powdered sugar
¼ c real butter (melted)
¼ tsp peppermint extract
6 tb milk
couple drops of food coloring (optional)
rose rubber candy mold
In a medium-sized bowl combine the powdered sugar, butter, extract, and milk. Knead the ingredients together with your hands for about five minutes until it is thoroughly mixed and you have a solid hard-like consistency of a very stiff icing. If you are using food coloring make sure that all the coloring is spread evenly throughout the candy.


Take a tsp of the mint candy, fill the rose mold, and press down firmly with both thumbs until the surface is smooth and even with the tip of the mold, discarding any extra filling. Turn the rose mold over and position both thumbs above the center of the mold.


Twist and pop the Rose Mint out on a waxed surface. If the candy sticks to the mold add some more powdered sugar. If the rose falls apart add more milk. Any disfigured roses can be instantly redone. Let the Rose Mints harden on wax paper for twenty-four hours and then store in a closed container!


Weekly tip: To make a crystallized mint as soon as you pop the mint out of the mold, gently turn the mint face down in a bowl of granulated sugar, and twist in a circle. Place upright on wax paper and let harden!


Dorcas Annette Walker is a published author, columnist, speaker, freelance magazine writer, and photographer from Jamestown, Tennessee. Contact her at: dorcaswalker@twlakes.net. For more recipes check out her Creative Tennessee Mountain Cookin blog at: www.dorcasannettewalker.com

Tuesday, December 9, 2008

Christmas Truffles


Christmas Truffles

Dorcas Annette Walker


One of the neat things about cooking is the control involved. If you are the cook you have the distinction of choosing what to cook. One of my favorite sayings is that if you can cook you have the privilege of making whatever you want. Cooking is also very versatile. You can carefully plan ahead for days only for on a sudden whim decide to change your mind or find yourself at the last minute trying to conjure up something. What cook hasn’t frantically searched through the refrigerator, cupboards, or freezer for a sudden inspiration to whip up a quick meal. Other times leisure hours spent in the kitchen over the stove is sheer pleasure. To my way of thinking anyone who hasn’t cooked has missed out on a large part of life.


This week I had planned ahead as usual what recipe I was going to give. Then I received a couple emails asking for some holiday candy and cookies ideas. I put aside my planned recipe and instead experimented around in the kitchen with a new candy recipe I had collected. It was an instant hit. I’m not one to lick out the bowls when cooking, but this time I couldn’t resist. You’ll know what I mean if you try out these Christmas Truffles. The best part is that they are not complicated to make. Next week I’ll give you a Christmas cookie recipe. For other holiday recipes of candy and fudge check out my other blog recipes or email me for a copy at: dorcaswalker@twlakes.net .


My Christmas Truffles have a rich creamy chocolate center with a smooth chocolate coating of different flavors that melts in your mouth. This candy will make you the envy of your friends. These easy Christmas Truffles are great for using your imagination and catering to individual taste buds guaranteeing an instant hit with everyone. The Christmas Truffles have only two basic ingredients and takes about fifteen minutes to prepare not counting refrigeration/freezer time. This recipe makes thirty-six Christmas Truffles.


Christmas Truffles


24 oz pkg of almond chocolate bark
1 (8 oz) pkg cream cheese
Mix until creamy: softened cream cheese and eight squares of the chocolate. Freeze or refrigerate until firm. Then mold a teaspoon of the candy mixture into a small ball and place on a waxed tray. Melt the remaining chocolate squares. A tablespoon of crunchy peanut butter or a drop or two of mint extract to some of the melted chocolate will give a delightful flavor. You can also substitute white chocolate. Dip the truffles into the melted chocolate until coated and let harden on the waxed tray. Garnish with finely chopped nuts, crushed peppermints, sprinkles, coconut, or powdered sugar!


Weekly tip: Unopened packages or unused portions of the chocolate bark can be kept year round in your freezer for instant access!


Dorcas Annette Walker is a published author, columnist, speaker, freelance magazine writer, and photographer from Jamestown, Tennessee. Contact her at: dorcaswalker@twlakes.net. For more recipes check out her Creative Mountain Cookin page at: www.dorcasannettewalker.com

Friday, December 28, 2007

To help welcome in the New Year I thought I’d give a couple of last minute treats that you can make to eat as you wait for the New Year to arrive. I plan to spend New Year’s Eve by my cozy woodstove fireplace curled up nearby in my recliner with a book. I’ll leave the partying to the rest of you as I enjoy a quiet evening relaxing by the fire- my favorite way of welcoming in the New Year. Have a great New Year filled with lots of culinary delights!


I discovered a quick and easy treat that I quickly whipped up for the holidays. These Marbled Chocolate Treats take only ten minutes to prepare and are delicious to nibble on. Marbled Chocolate Treats have a crunchy texture with a rich chocolate topping. My Marbles Chocolate Treat recipe makes eighteen treats.

Marbled Chocolate Treats
1 pkg Honey Graham Crackers
6 squares Baking Chocolate
½ c peanut butter (I used crunchy)
3 squares White Baking Chocolate
Line a 9 x 13 baking dish with tinfoil extending over the sides. Arrange graham crackers on the bottom until completely covering. Microwave the peanut butter and six squares of baking chocolate until melted (about 1-2 minutes). Stir until well blended then pour over the graham crackers spreading with a spatula until completely covered. Melt the white chocolate and drizzle over the top of the dark chocolate. Cut through the chocolate mixture with a knife to make a marbled effect. Refrigerate for one hour until firm. Turn over and let the chocolate come to room temperature before cutting along the graham cracker lines. Store the treats in an airtight container!


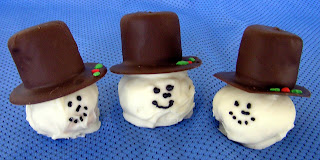
For the last couple of Christmas holidays my daughter, Dawn, has made adorable snowmen that you can eat. These eye-catching treats are irresistible to kids and adults alike. With a soft marshmallow hat covered in chocolate combined with a chocolate covered mild peanut butter head these Winter Snowmen treats will disappear fast. This recipe of Winter Snowmen takes about a half an hour to prepare and makes twelve snowmen.

Winter Snowmen
Snowmen Hats:
12 large marshmallows
6 squares of Baking Chocolate
Toothpicks
wax paper
candy leaves and berry sprinkles
Insert a toothpick on either side of a large marshmallow, dip into melted chocolate until well covered, and place on wax paper. Slowly swirl the marshmallow on the wax paper until you make a half-inch puddle of chocolate in a circle half an inch larger than the marshmallow. Center the marshmallow and take out the toothpicks. Decorate hat brims with candy leaves and berry sprinkles. Let cool and harden.

Snowmen heads:
1 c peanut butter (creamy)
½ c marshmallow cream
½ c powdered sugar
Mix together thoroughly until the consistency is dry yet clumps together. Add more powdered sugar if the dough is too sticky or more peanut butter if your dough won’t stick. Shape into inch size balls.
Melt in a microwave six squares of white chocolate until melted and dip the heads into the melted chocolate with a spoon until covered. Place on wax paper and let cool until hardened.
Use a small amount of melted chocolate (either flavor) to glue the hats and snowmen heads together. Decorate the snowmen’s faces with chocolate icing or black gel to make eyes, nose, and a smiley mouth. Store snowmen in an airtight container!

Weekly tip: A holiday tip to help speed up your meal serving time: place food into serving bowls and cover with saran wrap with the serving utensil as soon as they are prepared. Cold dishes can be refrigerated until time to sit on the table while hot dishes can be kept warm on the stove or in the microwave. When ready to serve your meal it will take only a couple of seconds to transfer your dishes to the table!

Dorcas Annette Walker is a freelance writer, author, columnist, and photographer from Jamestown, TN. If you have any cooking tips or favorite recipes you are welcome to contact me by mail at: Dorcas Walker, 929 Wildwood Lane, Jamestown, TN 38556 or email me at: dorcaswalker@twlakes.net For more information about the Walker family and Dorcas’ books check out her website at: www.dorcasannettewalker.com or htpp://dorcasannettewalker.blogspot.com for other Creative Mountain Cookin recipes.

Ten Minute No-Fail Fudge


Ten Minute No-Fail Fudge
Dorcas Annette Walker

My memories of fudge and candy making are few and far between. I know one reason for this is because the process always entailed what seemed like hours of time hanging over a saucepan faithfully stirring to keep the ingredients at the right temperature and avoiding scorching until arriving at the correct processing time by dribbling a bit of hot liquid into a cup of cold water, which then gave way to intense concentration to see if a soft or hard ball appeared. For some reason the end result was either too runny or hard enough to crack one’s teeth. When it comes to cooking candy or anything mechanical I remain hopelessly jinxed. It’s definitely a faulty gene passed down to me from my mother. All the work involved never seemed worth the pathetic results. You can never accuse me of being a quitter though. Every couple of years as my memory would dim from the last candy making disaster, a mouth watering picture of delectable pieces of candy would catch my attention always accompanied with another easy or no-fail recipe and I’d find myself once again in my kitchen hovering over a boiling pot sure that this time my candy would turn out perfect.

One candy making memory remains permanently etched on my brain cells in neon lights. While still living on the college campus where my husband attended school, I somehow became involved with a staff yearbook committee. On one such occasion I had the brainstorm of making homemade lollypops. The recipe seemed quite simple and I figured that if I could turn out four pies a week making lollypops would be a breeze. I faithfully stirred and cooked and then poured the hot candy into my molds. When it came time for the staff meeting my lollypops were still kinda gooey, but always optimistic I took them along figuring they would make a conservation piece if nothing else. Little did I realize what historic proportions my homemade lollypops would create. Everyone greeted my lollypops with pleasure sticking them into their mouth as they were passed along the table. Once in one’s mouth though it took jaw-breaking work to get your teeth unstuck from the candy. Everybody became occupied trying to un-stick their teeth from the candy to do much business. It was the shortest and quietest staff meeting in the entire history of the school.

My Ten Minute No-Fail Fudge recipe is not only delicious, but also healthful. It is similar in process to the after dinner mints that I make and when I say it is a no-fail recipe you can count on it to turn out beautifully for your holiday festive gatherings. Ten Minute No-Fail Fudge involves only ten minutes of your time and one batch makes twenty-four pieces of good size fudge about an inch thick. My recipe of Ten Minute No-Fail Fudge can make either chocolate or peanut butter fudge.

Ten Minute No-Fail Fudge

Melt in microwave for about four minutes at one minute intervals stirring between times until completely melted:
¼ box of a 2 lb box of Velveta (or store brand) process cheese spread cut into small chunks
1 stick of margarine
If making peanut butter fudge also include: 1 c peanut butter (I used chunky)
When completely melted add:
1 tsp vanilla
Pour mixture into:
2 lbs powdered sugar
If making chocolate fudge add to powdered sugar:
1 c cocoa powder
1 c chopped nuts (your choice)
Stir and then mix together with your hands until completely combined. Place fudge in a waxed 9 x 13 dish. Use a small rolling pin to smooth out the top. When cool cut into inch pieces and serve on a decorative holiday dish!

Dorcas Annette Walker is a freelance writer, author, columnist, and photographer from Jamestown, TN. If you have any cooking tips or favorite recipes you are welcome to contact me by mail at: Dorcas Walker, 929 Wildwood Lane, Jamestown, TN 38556 or email me at: dorcaswalker@twlakes.net For more information about the Walker family and Dorcas’ books check out her website at: www.dorcasannettewalker.com or htpp://dorcasannettewalker.blogspot.com for other Creative Mountain Cookin recipes.

Thursday, April 5, 2007

Chocolate-Covered Cocoanut/Peanut Butter Easter Eggs


Chocolate-Covered Cocoanut/Peanut Butter Easter Eggs
Dorcas Annette Walker

My daughter is the one in our family now who makes all kinds of holiday candy. A couple of years ago I gave her my candy molds for making chocolate Easter bunnies and decorative eggs. What fun we had experimenting in the kitchen as my kids grew up during Easter time making candy. Taste testing was the crowning result after a day spent creating home-made masterpieces.

Making and buying Easter candy is an old custom that many believe started with the traditional breakfast of eating Hot Cross Buns on Good Friday. During the early 1800’s chocolate was the rage in Europe. Chocolate companies sought to use the image of an egg to celebrate Easter and sell their products. Soon solid and hollow chocolate eggs grew in popularity and became the primary Easter candy throughout the world and here in America by the 20th century. European children went from house to house begging for Easter eggs like our Halloween trick-or-treaters. Long hard winters for the pioneers often meant little food and a fresh egg for Easter was quite a prize. The White House Easter Egg Roll is one of the oldest and most unique traditions in presidential history. On occasion the Easter Egg Roll has been cancelled due to inclement weather or in times of war. The longest hiatus of the Easter Egg Roll was for World War II followed by a White House renovation. Today Easter candy is now second in the top-selling candy holidays. Americans spend an average of 1.9 billion dollars on Easter candy each year.

Even though my daughter, Dawn, has my Easter candy molds I still can make Chocolate-Covered Cocoanut/Peanut Butter Easter Eggs each year. These large candy eggs are hand-made without using a mold, covered in rich chocolate, and decorated. All you need is a couple medium-sized bowls, wax paper, and some colored icing to get started. My home-made Chocolate-Covered Cocoanut/Peanut Butter Easter Eggs takes around a half an hour each to prepare (not counting the time to chill the eggs) and makes one pound or two half pound eggs.

Cocoanut Egg

1 lb powered sugar
½ c condensed milk
1 stick of melted margarine
1 c cocoanut
½ c chopped nuts (optional)

Mix ingredients thoroughly by hand in a medium-sized bowl and shape into one or two large eggs. Place on wax paper and chill for one hour. Then dip chilled egg in melted chocolate. Let sit until egg is room temperature and slice with a sharp knife to serve. May decorate Chocolate-Covered Cocoanut Egg with colored icing!

Peanut Butter Egg

1 lb powered sugar
1 c crunchy or creamy peanut butter
1 stick of melted margarine
1 tsp vanilla

Mix ingredients thoroughly by hand in a medium-sized bowl and shape into one or two large eggs. Place on wax paper and chill for one hour. Then dip chilled egg in melted chocolate. Let sit until egg is room temperature and slice with a sharp knife to serve. May decorate Chocolate-Covered Peanut Butter Egg with colored icing!

Dorcas Annette Walker is a freelance writer, author, columnist, and photographer from Jamestown, TN. If you have any cooking tips or favorite recipes you are welcome to contact me by email at: dorcaswalker@yahoo.com. For more information about the Walker family and Dorcas’ books check out her website at: www.dorcasannettewalker.com or htpp://dorcasannettewalker.blogspot.com for other Creative Mountain recipes.

Monday, April 2, 2007

Rice Crispy Easter Eggs


Rice Crispy Easter Eggs
Dorcas Annette Walker

The Easter holidays bring back memories of when my children were small. Our family celebrations were quite a departure from my own childhood. I colored hard-boiled eggs with my kids using Easter egg color kits and then graduated to the colorful shrink-wrapped egg decorations that you attached by placing a hard boiled egg into a thin wrapping, immersed in boiling water, and instantly you had a decorated egg. Easter Sunday I’d hide plastic eggs around my yard with small pieces of candy or money inside. I had a large prize egg that I filled with something special. Easter was a fun time of celebrating together as a family in a simple manner. I’m amazed at how enormous the Easter holiday has exploded into. The commercialism is almost as bad as Christmas. I still enjoy making up Easter baskets for my two grandkids.

The first time I ever ate Rice Krispie cereal was at my grandmother’s house. At home we started out each day with a bowl of cooked oatmeal and applesauce. We were fascinated eating a cereal that came out of a box, popped and crackled, and had small prizes inside. The secret to the Kellogg Rice Krispies famous snapping and popping sound was rice grain that was cooked, dried, and toasted forming bubbles of thin walls that would collapse suddenly when exposed to milk. It wasn’t until I was grown and married that I heard of and began making Rice Krispie Treats. It was a quick, popular snack that I could whip up for overnight visits of my children’s friends and these treats were always a welcome addition to school bake sales.

Malitta Jensen and Mildred Day are known as the two that invented the Rice Krispie Treats as a way to raise money for the annual Campfire Girls troops. The residents of Battle Creek, Michigan were fiercely loyal to the local Kellogg Company that didn’t lay off a single employee during the 1940’s when other companies fell broke. Malitta and Mildred wanted to come up with something different than the usual chocolate chip cookies sold to raise money for their girl’s troop. They were familiar with an old recipe using Puffed Rice, molasses, and vinegar, but they decided to try using a box of Campfire marshmallows instead with the Kellogg’s Rice Krispie cereal. Cut into squares, wrapped in Saran Wrap, and tied with ribbons these treats were an instant hit. Recipes of the Rice Krispie Treats first appeared on Kellogg cereal boxes in 1941 and were homemade until January 15, 1995.

My Rice Crispy Easter Eggs evolved during an Easter holiday when I was making a Rice Crispy snack. My kids were teens and I missed the mess and excitement of coloring eggs. What could I do as a substitute? My imagination kicked in as I experimented with adding colorful candy sprinkles. I then shaped the Rice Crispy’s into egg shapes and sat them in pastel baking cups. Presto! I had a perfect Easter egg treat for my teens. These Rice Crispy Easter Eggs take only about fifteen minutes to prepare and one batch makes around twenty-five eggs.

Rice Crispy Easter Eggs

Microwave in large bowl 3-5 minutes until melted:
1stick of margarine
½ c chunky peanut butter
1 bag marshmallows

Stir in until coated:
6 c any brand of rice crispy
½ c candy sprinkles

Let sit for five minutes to cool and then form into ball-shaped eggs. Place the Rice Crispy Easter Eggs in pastel baking cups. Store in airtight container. May decorate with colored Easter grass!

Dorcas Annette Walker is a freelance writer, author, columnist, and photographer from Jamestown, TN. If you have any cooking tips or favorite recipes you are welcome to contact me by email at: dorcaswalker@yahoo.com. For more information about the Walker family and Dorcas’ books check out her website at: www.dorcasannettewalker.com or htpp://dorcasannettewalker.blogspot.com for other Creative Mountain recipes.