To help welcome in the New Year I thought I’d give a couple of last minute treats that you can make to eat as you wait for the New Year to arrive. I plan to spend New Year’s Eve by my cozy woodstove fireplace curled up nearby in my recliner with a book. I’ll leave the partying to the rest of you as I enjoy a quiet evening relaxing by the fire- my favorite way of welcoming in the New Year. Have a great New Year filled with lots of culinary delights!
I discovered a quick and easy treat that I quickly whipped up for the holidays. These Marbled Chocolate Treats take only ten minutes to prepare and are delicious to nibble on. Marbled Chocolate Treats have a crunchy texture with a rich chocolate topping. My Marbles Chocolate Treat recipe makes eighteen treats.
Marbled Chocolate Treats
1 pkg Honey Graham Crackers
6 squares Baking Chocolate
½ c peanut butter (I used crunchy)
3 squares White Baking Chocolate
Line a 9 x 13 baking dish with tinfoil extending over the sides. Arrange graham crackers on the bottom until completely covering. Microwave the peanut butter and six squares of baking chocolate until melted (about 1-2 minutes). Stir until well blended then pour over the graham crackers spreading with a spatula until completely covered. Melt the white chocolate and drizzle over the top of the dark chocolate. Cut through the chocolate mixture with a knife to make a marbled effect. Refrigerate for one hour until firm. Turn over and let the chocolate come to room temperature before cutting along the graham cracker lines. Store the treats in an airtight container!
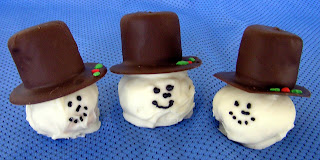
For the last couple of Christmas holidays my daughter, Dawn, has made adorable snowmen that you can eat. These eye-catching treats are irresistible to kids and adults alike. With a soft marshmallow hat covered in chocolate combined with a chocolate covered mild peanut butter head these Winter Snowmen treats will disappear fast. This recipe of Winter Snowmen takes about a half an hour to prepare and makes twelve snowmen.
Winter Snowmen
Snowmen Hats:
12 large marshmallows
6 squares of Baking Chocolate
Toothpicks
wax paper
candy leaves and berry sprinkles
Insert a toothpick on either side of a large marshmallow, dip into melted chocolate until well covered, and place on wax paper. Slowly swirl the marshmallow on the wax paper until you make a half-inch puddle of chocolate in a circle half an inch larger than the marshmallow. Center the marshmallow and take out the toothpicks. Decorate hat brims with candy leaves and berry sprinkles. Let cool and harden.
Snowmen heads:
1 c peanut butter (creamy)
½ c marshmallow cream
½ c powdered sugar
Mix together thoroughly until the consistency is dry yet clumps together. Add more powdered sugar if the dough is too sticky or more peanut butter if your dough won’t stick. Shape into inch size balls.
Melt in a microwave six squares of white chocolate until melted and dip the heads into the melted chocolate with a spoon until covered. Place on wax paper and let cool until hardened.
Use a small amount of melted chocolate (either flavor) to glue the hats and snowmen heads together. Decorate the snowmen’s faces with chocolate icing or black gel to make eyes, nose, and a smiley mouth. Store snowmen in an airtight container!
Weekly tip: A holiday tip to help speed up your meal serving time: place food into serving bowls and cover with saran wrap with the serving utensil as soon as they are prepared. Cold dishes can be refrigerated until time to sit on the table while hot dishes can be kept warm on the stove or in the microwave. When ready to serve your meal it will take only a couple of seconds to transfer your dishes to the table!
Dorcas Annette Walker is a freelance writer, author, columnist, and photographer from Jamestown, TN. If you have any cooking tips or favorite recipes you are welcome to contact me by mail at: Dorcas Walker, 929 Wildwood Lane, Jamestown, TN 38556 or email me at: dorcaswalker@twlakes.net For more information about the Walker family and Dorcas’ books check out her website at: www.dorcasannettewalker.com or htpp://dorcasannettewalker.blogspot.com for other Creative Mountain Cookin recipes.
Creative Tennessee Mountain Cookin is a recipe blog flavored with a bit of food history spiced with Tennessee Mountain living.
Friday, December 28, 2007
Ten Minute No-Fail Fudge
Dorcas Annette Walker
My memories of fudge and candy making are few and far between. I know one reason for this is because the process always entailed what seemed like hours of time hanging over a saucepan faithfully stirring to keep the ingredients at the right temperature and avoiding scorching until arriving at the correct processing time by dribbling a bit of hot liquid into a cup of cold water, which then gave way to intense concentration to see if a soft or hard ball appeared. For some reason the end result was either too runny or hard enough to crack one’s teeth. When it comes to cooking candy or anything mechanical I remain hopelessly jinxed. It’s definitely a faulty gene passed down to me from my mother. All the work involved never seemed worth the pathetic results. You can never accuse me of being a quitter though. Every couple of years as my memory would dim from the last candy making disaster, a mouth watering picture of delectable pieces of candy would catch my attention always accompanied with another easy or no-fail recipe and I’d find myself once again in my kitchen hovering over a boiling pot sure that this time my candy would turn out perfect.
One candy making memory remains permanently etched on my brain cells in neon lights. While still living on the college campus where my husband attended school, I somehow became involved with a staff yearbook committee. On one such occasion I had the brainstorm of making homemade lollypops. The recipe seemed quite simple and I figured that if I could turn out four pies a week making lollypops would be a breeze. I faithfully stirred and cooked and then poured the hot candy into my molds. When it came time for the staff meeting my lollypops were still kinda gooey, but always optimistic I took them along figuring they would make a conservation piece if nothing else. Little did I realize what historic proportions my homemade lollypops would create. Everyone greeted my lollypops with pleasure sticking them into their mouth as they were passed along the table. Once in one’s mouth though it took jaw-breaking work to get your teeth unstuck from the candy. Everybody became occupied trying to un-stick their teeth from the candy to do much business. It was the shortest and quietest staff meeting in the entire history of the school.
My Ten Minute No-Fail Fudge recipe is not only delicious, but also healthful. It is similar in process to the after dinner mints that I make and when I say it is a no-fail recipe you can count on it to turn out beautifully for your holiday festive gatherings. Ten Minute No-Fail Fudge involves only ten minutes of your time and one batch makes twenty-four pieces of good size fudge about an inch thick. My recipe of Ten Minute No-Fail Fudge can make either chocolate or peanut butter fudge.
Ten Minute No-Fail Fudge
Melt in microwave for about four minutes at one minute intervals stirring between times until completely melted:
¼ box of a 2 lb box of Velveta (or store brand) process cheese spread cut into small chunks
1 stick of margarine
If making peanut butter fudge also include: 1 c peanut butter (I used chunky)
When completely melted add:
1 tsp vanilla
Pour mixture into:
2 lbs powdered sugar
If making chocolate fudge add to powdered sugar:
1 c cocoa powder
1 c chopped nuts (your choice)
Stir and then mix together with your hands until completely combined. Place fudge in a waxed 9 x 13 dish. Use a small rolling pin to smooth out the top. When cool cut into inch pieces and serve on a decorative holiday dish!
Dorcas Annette Walker is a freelance writer, author, columnist, and photographer from Jamestown, TN. If you have any cooking tips or favorite recipes you are welcome to contact me by mail at: Dorcas Walker, 929 Wildwood Lane, Jamestown, TN 38556 or email me at: dorcaswalker@twlakes.net For more information about the Walker family and Dorcas’ books check out her website at: www.dorcasannettewalker.com or htpp://dorcasannettewalker.blogspot.com for other Creative Mountain Cookin recipes.
Tuesday, December 18, 2007
Peppermint Angel Food Cake
Dorcas Annette Walker
Red and white striped peppermints and candy canes have been a part of our household from the very beginning. I decorate with a country theme for Christmas. Our children grew up stringing popcorn (day old works best) and hanging candy canes on our Christmas tree along with homemade ornaments. The rest of the year I always kept peppermints handy. If a church service was lengthy I’d hand out peppermints to my restless kids. Car sick while traveling? Upset stomach? Sore throat? Peppermints are the perfect cure. My grown daughter hates the sight of peppermints and tells anyone who will listen how I tortured her childhood with my peppermint cure for everything. She refuses to have any in her house. Interesting enough her daughter, my granddaughter, loves grandma’s peppermints so I always give her a handful to take home. While I no longer string popcorn or hang peppermint candy canes on my Christmas tree I always keep some around for the holidays. I leave the new-fangled candy canes available in all sorts of colors and flavors for the younger generation. So it was an instant love affair for me when I first heard the concept of a Peppermint Angel Food Cake.
As early as 1901 the pure King Leo peppermint candy stick was produced and marketed. It is still available today in old-fashioned gift tins by its currant manufacture, Quality Candy Company Inc. The candy cane, a traditional candy for Christmas holidays, was originally a straight, hard, all-white stick that was invented by the French priests in the early 1400’s. The candy cane’s shape is credited to a choirmaster in Germany in 1670 who legend has it bent the sugar sticks into canes to represent a shepherd’s staff. Another theory is that as people decorated their Yule trees with food the bent candy cane was invented as a functional solution. Candy canes with red stripes and peppermint flavoring first appeared in the early 1900’s. In the 1920’s Bob McCormack began making candy canes in Albany, Georgia by hand. In 1950 his brother-in-law, a Catholic priest, invented a machine to produce candy canes. Today many machines are used in the production of making candy canes. Sugar and corn syrup is vacuum cooked in large kettles. When the candy is poured onto a cooling table peppermint and starch are added to hold the flavor and prevents stickiness while a kneader mixes the flavoring into the candy until it turns a golden brown color. Then the candy is placed into a puller that turns the candy white and is made into a log-like shape. The stripes are formed on a heating table after which the candy is formed into a cone shape where sizing wheels reduce it to the diameter of a candy cane and turn it into a rope. Next a twister makes the rope into a barber pole. A cutter then snips the candy into strips. While still warm the candy canes are placed in wrappers where heat will shrink-wrap the candy. A crooker gives the candy cane its hook. Finally the candy canes are inspected and shipped out to sell. National Candy Cane Day is celebrated on December 26th. The world’s largest candy cane was created by Paul Gbinellie measuring 58 feet and 2¼ inches. Each year 1.76 billion candy canes are made.
My Peppermint Angel Food Cake is an elegant holiday dessert that will instantly attract chocolate lovers as well as others. The soft angel food texture interspersed with swirls of peppermint, combined with rich chocolate, and bits of crunchy peppermint will make this a never to be forgotten dessert. Preparation time for the Peppermint Angel Food Cake takes around fifteen minutes and serves sixteen.
Peppermint Angel Food Cake
1 angel food cake mix
¼ tsp peppermint extract
10 peppermints (I used sugar free)
Prepare the angel food cake mix as directed adding the peppermint extract. Pour the batter into a tube pan. Crush the peppermints and gently fold into the batter. Bake at 350º for 35-40 minutes until golden brown.
Icing:
¼ c cocoa
pinch of salt
2 c powdered sugar
¼ c shortening
1 tsp vanilla
¼ c milk
7 peppermints (crushed)
Blend cocoa, salt, and powdered sugar together. Mix in shortening and vanilla. Add milk and beat until smooth. You can add more milk for a thinner frosting. Ice cake with the chocolate frosting until completely covered. Sprinkle crushed peppermints on the top and around the side. May garnish with candy canes!
Dorcas Annette Walker is a freelance writer, author, columnist, and photographer from Jamestown, TN. If you have any cooking tips or favorite recipes you are welcome to contact me by mail at: Dorcas Walker, 929 Wildwood Lane, Jamestown, TN 38556 or email me at: dorcaswalker@twlakes.net For more information about the Walker family and Dorcas’ books check out her website at: www.dorcasannettewalker.com or htpp://dorcasannettewalker.blogspot.com for other Creative Mountain Cookin recipes.
Tuesday, December 11, 2007
Chocolate Carmel Party Mix
Dorcas Annette Walker
Being prepared for the unexpected has become an obsession with me; especially when it comes to keeping food handy. Psychologists would probably say that it stems from my childhood. I had the symptoms of a diabetic despite normal blood tests. It wasn’t until I was grown that hypoglycemia became known. By then I had become adept at keeping food handy in case my sugar started dropping. Whenever I went traveling with my husband I always kept a snack bag handy. In true masculine form my husband would periodically protest about the amount luggage that I thought was absolutely necessary for travel. I even took some home remedies along because sure as you’re living if I wasn’t prepared the entire family would be hit with a severe case of the flu out in the middle of nowhere. As my family increased so did the snack bag. I remember one trip in particular where my husband tried to pare everything down to bare bones after several lectures about always having to haul around so much stuff. He stood at the front door as a sentinel inspecting and handling every piece of luggage. So needless to say his eyes bulged out when I handed him two stuffed-to-capacity grocery bags full of snacks to take. I’m generally mild mannered, but one thing my husband has slowly learned over the years that once I take a stand nothing will budge me. There is one rule of thumb for traveling with children that I learned early on. Once a restaurant has been chosen for lunch you can count on the fact that that particular restaurant will not be around for the next couple hundred miles. Also different times throughout our years of travel we stayed in the homes of senior citizens who ate only one meal a day so my snack bags saved our lives more than once. Several minutes later muttering and still protesting loudly my husband reluctantly packed my snack bags. As I knew exactly what would happen and what quickly became a family joke we weren’t on the road for even an hour before my husband asked, “Honey, what did you bring along to eat?”
Holidays at our house are filled with overflowing tables of food at mealtimes. I also like to keep snacks on hand for between meals and in the evenings when traditional family games or puzzles are being done. There is nothing that stimulates the brain more as a few snacks to munch on while pondering the move that will win the game. Chocolate Carmel Party Mix is a combination of different party mixes I have used through the years. The chocolate and Carmel combination and is bound to be a hit at your house during the holiday season. This party mix makes a big batch (ideal for Christmas parties), can be made ahead of time, and stored. Preparation time for the Chocolate Carmel Party Mix takes one hour and a half (baking time included) and this recipe makes close to three gallons of party mix.
Chocolate Carmel Party Mix
You need one box each of:
12.8 oz Rice Chex
14 oz Corn Chex
14 oz Wheat Chex
16 oz jar of peanuts (salted or unsalted)
½ 16 oz bag of Tiny Twist pretzels
Chocolate Mix:
In a large bowl place:
5 c Rice Chex
5 c Corn Chex
Microwave for three minutes until melted:
1 stick of margarine
1 (12oz) semi-sweet chocolate chips
½ c peanut butter (I used crunchy)
Pour over the Chex cereal, stir until well coated, and chill in the refrigerator.
Carmel Mix:
In a large bowl place:
4 c Wheat Chex
4 c Corn Chex
4 c Rice Chex
16 oz jar of peanuts
4 c Tiny Twist pretzels
Bring to a boil in saucepan:
2 sticks of margarine
2 c brown sugar
8 tb light corn syrup
2 tsp vanilla
Pour over the Chex cereal and stir until coated. Bake at 350º for forty-five minutes stirring every fifteen minutes. Completely cool then mix together the chocolate and Carmel party mix and serve!
Dorcas Annette Walker is a freelance writer, author, columnist, and photographer from Jamestown, TN. If you have any cooking tips or favorite recipes you are welcome to contact me by mail at: Dorcas Walker, 929 Wildwood Lane, Jamestown, TN 38556 or email me at: dorcaswalker@twlakes.net. For more information about the Walker family and Dorcas’ books check out her website at: www.dorcasannettewalker.com or htpp://dorcasannettewalker.blogspot.com for other Creative Mountain Cookin recipes.
Tuesday, December 4, 2007
Peanut Butter Jam Jams
Dorcas Annette Walker
I came across a recipe the other day that instantly reminded me of my mother. Like I’ve said before my mother didn’t have time to do a lot of cooking due to having to take care of my father, who had severe hemophilia, and working full time as a nurse to keep a roof over our heads. Then just as she was ready for retirement the HIV that she was infected with from my father turned into AIDS and she died. Despite the fact the daily duties of life kept my mother on the edge of physical exhaustion, my mother was quite creative- a gene passed down to both my sister and I. So I can remember quite clearly the day my mother baked a different kind of cookie than ever before. We were quite entranced and eager to help while my practical father sitting in a wheelchair nearby shook his head and snorted about the waste of time and nonsense our mother was engaged in. That day remains a special memory in my mind; an overworked mother baking cookies and letting two giggling little girls’ help- a process that I am sure slowed things down considerably. I forget which one of us had the honor of making a cookie ball, while the other flattened down the middle with a spoon, with our mother finishing up by carefully placing a dab of jam in the middle. We could hardly wait for the first taste and when we had sampled the warm cookies we declared them to be the best ever. The old fashion, yet new to us, cookie was called “Jam Polka Dots”. When I got married it was one recipe that I made sure to copy down. Over the years I slowly forgot about those cookies after making some for my children when they were in school. To my kids store bought cookies and snacks were considered a treat compared to the homemade cookies that were always available. After my daughter was grown I found out she used my homemade cookies for barter at school to kids that only had store bought snacks. They were thrilled to get homemade cookies while she was enthralled over their store bought treats. I had to laugh at the irony as growing up we always had store bought cookies and to us homemade cookies were the ultimate treat. Discovering my mother’s recipe again I pulled it out and put it in a place I wouldn’t forget to make for my grandchildren during the Christmas holidays. Interesting enough I came across a couple of other recipes that were similar yet different, which got my mind to buzzing. So the other day I got out my big mixing bowl and decided to make up a batch of these cookies combining some of the different ingredients together. I came up with what I call Peanut Butter Jam Jams. I was intrigued with the idea of adding peanut butter to the dough, which brought back instant memories of school days when we ate peanut butter and jelly sandwiches. Knowing my mother she would be pleased with my creative twist to her cookies.
Peanut Butter Jam Jams are a decorative cookie that despite its small size is quite filling. These eye-catching cookies are perfect for the holidays. Contrary to one’s first opinion, Peanut Butter Jam Jams are not a real sweet cookie making it an ideal snack between meals. The crunchy peanut butter oat cookie contrasts with the smooth jelly filling on top. This recipe of Peanut Butter Jam Jams makes three-and- one-half dozen finished cookies and takes about ten minutes preparation.
Peanut Butter Jam Jams
In a large bowl cream together:
1 c shortening
1 c peanut butter (I used chunky)
1 c brown sugar
2 eggs
2 tsp vanilla
Add:
3 c self-rising flour
1½ c quick-cooking rolled oats
Mix thoroughly. Dough will be of a dry consistency. Form dough into one inch balls and place on well greased cookie sheets. Make a depression in the center by using your thumb or a teaspoon. Fill with ½ tsp of jelly or jam (use different kinds of jelly for variation in colors). Bake at 350º for ten minutes. Let cool and serve on a decorative plate!
Dorcas Annette Walker is a freelance writer, author, columnist, and photographer from Jamestown, TN. If you have any cooking tips or favorite recipes you are welcome to contact me by mail at: Dorcas Walker, 929 Wildwood Lane, Jamestown, TN 38556 or email me at: dorcaswalker@yahoo.com. For more information about the Walker family and Dorcas’ books check out her website at: www.dorcasannettewalker.com or htpp://dorcasannettewalker.blogspot.com for other Creative Mountain Cookin recipes.